Showing posts with label DIY. Show all posts

Friday, April 15, 2016

L is for Lemon Grass

Lemongrass is one of those things that the naming is true. It is in the herb family but grows in a large "grassy" clump and the flavor is definitely citrus. Which leads to all kinds of uses in dishes and teas.  It can be grown in the garden or in landscapes in zones 9 and warmer. If you are in cooler climates  you'll want to stick with potted plant that can be brought in over winter or just as an annual.

Interested in growing Lemongrass at home, it can be started from seeds or from shoots. I've found seeds available from Baker Seeds , Johnny's selected seeds and I'm sure there are other companies that carry them. You can also root the plant from stems. If you get a fresh piece go ahead and pull off the outside leaves until you have bare stem. Place it a glass with a couple of inches of water for a couple of days and you should see roots forming in no time. Small leaves will form then you can go ahead and plant in the garden or a pot.
Lemongrass A Garnish Of Tom Yum Goong. (thai Food) Stock Photography - 28801142
image from dreamstock.com
In the garden Lemon grass can grow in a clump from 3 to 5 feet tall. It is a tropical plant and needs full sun, it can be over wintered in warmer climates or kept in a pot and brought in during the cold months. It will need a moist soil, so frequent watering is best.

It's generally used in Asian cuisines but the leaves can also be used to make a tea. It is high in Vitamin C, A, Magnesium and Folic Acid. Lemon Grass tea can be made by seeping one teaspoon of fresh or dried lemongrass leaves in a cup of hot water for 10 minutes. Or you can find it already made into tea bags at specialty stores. The tea has been shown to help arthritis, digestive issues and to lower cholesterol. It has a light lemon taste, unlike many herbal teas have a slightly "weedy" flavor.


Check out these recipes using Lemongrass and then buy a bit extra to add to your garden!


Thanks for stopping by, the crud has caught up to me, I'm blaming it on the weather and this post is a bit late but it's here Today's post is in the works an will be posted today also. So double the reading. Check back for Milkweed for the M post in the A to Z Challenge!

Thursday, March 31, 2016

Growing Sprouts for Chickens

I've kinda dropped out of the blogging world for a bit but I'm heading into April with the best of Intentions. I've decided to do the A to Z blogging Challenge again this year to get myself back into the swing of writing again. I really do enjoy the writing, the challenge as well as meeting new people and find new awesome blogs!

My getting back into it post is one  that has been brewing around for a while. I was supposed to be a February post, back when the chickens didn't have any greens, other than what I was hiding from them in the garden. Sorry girls, it's still off limits but you have other things to keep you busy now.
I was feeling sorry for them since the pickings for fresh greens was a bit slim, oh they were still getting scraps and their favorites but the foraging just wasn't happening. So I decided to create some foraging opportunities for them.

What is a Spout? A sprout is a whole grain or seed that has been grown with just water. Once a seed has been germinated it is considered a sprout until it reaches 4 inches, after that it is considered Fodder, which is a whole nother concept. Obviously they start out the same way but since Fodder grows longer it runs the risk of growing bacteria and therefore it takes a bit more attention and work.

Are there any benefits to sprouting grains over just regular feed?
I think so and some science backs that up. Our Girls are spoiled and can get into trouble during the colder months so a bit of well placed sprouts can entertain them as well as give them something healthy in their diet. It has also been shown that sprouts are easier to digest and that the sprout it's self has beta-carotene as well as more available nutrients  as compared to the unsprouted grain.

What kind of seeds should I use? I've sprouted grains and beans for our consumptions but I wanted to try something that would interest the mini velociraptors we have in the yard. So I did some research and came up with Scratch and Peck Foods . They have a great variety of grains, suitable for sprouting or just scatter feedings. I picked the 3 Grain Scratch. As you can see below it's non-gmo and organic, which are both important to us. This type includes Barley, Wheat and Oats, all great for sprouting. We don't have a local retailer so I ordered mine from Amazon. It's not the only thing out there and you can try a variety of seeds, grains or beans that work great for chickens.


Here's a view of the grains. We'll have enough for sprouting, and treats for a while!

Is it hard or time consuming? Sprouting grains is an easy task, that really only takes minutes a day for great results. So if you've sprouted before or aren't really sure what I'm talking about this will walk you through some of the basic steps to get started growing a great supplement for your poultry

Do I need a bunch of special equipment or a ton of space? Nope, I use a couple of containers I had on hand, but you can use jars, used berry containers or check out some of the serious sprouting options out there. I kept my on my kitchen table, it gets a good amount of sun, but window sills are great places too. The temps should be between 45 and  70 degrees. 

Ready to get started? Good Deal here we go!

1.The first thing is to take your grains/seeds and soak them in clean water for 8 to 24 hours. Make sure the water covers the grain completely. I soak mine overnight. It's the last thing I do and then when I get up they are ready to go.
2. Getting your containers ready, Pick a container with very small holes or poke holes in the container you plan on using. Not too big because you don't want to loose you seeds when you rinse. Any size container will do but I recommend smaller containers just because they are easier to handle, and a small amount of seeds will produce a large amount of sprouts.


3.Drain your grains well and spread them into your container 1/4 to 1/2 inch deep.


4. The sprouts will need to be watered and drained completely twice a day for 5 to 6 days. At which time they will be ready to fed to your poultry! I took my containers and put them in a larger container with water, allowed them to sit for a few minutes and they took them out and left then in the sink to drain.

To give you an idea of what you can look forward to, here is a day by look at my efforts!

Day One

Day Two


Day Three- roots are really growing fast!

Day Four- Sprout Side

Day Six - Let the Feast Begin!

I had a few so I strategically placed them around the yard

And the great part is there is no waste! They eat the entire thing!

I hope this encourages you to grow some sprouts for your Flock, I'll be starting another batch this weekend for our newbies, since they are shut in until they get a bit bigger!
Aww aren't they the cutest?

Thanks for stopping by and remember to check out the A to Z Challenge which starts on the 1st! No Fooling here!. I'm going to be talking about a different kind of Fruit,Veggie or Herb everyday. You might just find something you can't wait to try! 


Thursday, January 7, 2016

Christmas Trees can keep on giving


We are on the Bah Humbug side of the Holidays and didn't even put up a tree this year. But we had visited our friend Toni at Possumwood Acres, which is a wildlife rehabilitation center that works mainly with birds, squirrels and other small mammals. When we lived closer we were able to volunteer when the rescue was just getting started and now that we have moved away we try to drop in a couple of times a year to help and bring donations. I had visited at Thanksgiving since we were home for the Holiday and one of the requests was for Christmas Trees. They use them in the large Raptor enclosures as well as smaller cages as well as wind breaks for the water foul. 

We sent out a request on facebook closer to Christmas to our friends to let us know when they would be done with their trees, so we could take them back down to Toni. Then about a week before Christmas we were at Tractor Supply and they had a large group of trees on clearance, we asked what happens when the holiday is over. They said they would be disposed of unless we were interested in taking them off of their hands. We left our information and not long after we received a call to come pick up the left over trees. 

 We loaded up the trees, a few very old things from our freezer ( for the buzzards), and two boxes of collards from our garden for the swans and headed over to Hubert. Everyone was very happy to see see us arrive and with a few helping hand we unloaded quickly. 

It was one of the few really cold days we've had lately, so we didn't spend as much time hanging around as we normally would have but I can share a few pictures of the residents with you.
This is just one of the owls that have been brought in injured recently, lots of owls and other large birds come in, are rehabilitated and released back into the wild.

This is a "Tea Cup" Pig that out grew the cuteness and was put out to defend herself. She's happily digging for nuts the squirrel's have hidden in a safe new home.

This is tucker and he's happy to me sharing Thanksgiving and Christmas with us running around instead of on a plate!


If your looking to upcycle your tree too, here's a couple of ideas for you, just in case you don't have a local wildlife rehab center that is in need of trees. 

I'm originally from a coastal county and there was always a call for trees to help shore up the dunes, check with your local park service to see what options are available in your area.

Don't have the ability to haul off your tree, birds would love to enjoy your tree right in your back yard for a bit. Make sure you take off all tinsel and ornaments and set your tree out back. You could even add some bird cakes and other feeders to the tree to bring the local birds to your back yard. Once it dries out it will be easier to break part and dispose of.

Some communities have a recycling program to turn trees into mulch. That's a win win for everyone.

Another option right at home is to turn your tree into a refuge for fish! Do you or a friend have a pond then dump it right into the water. It creates a great place for fish to hide, provides a safe place for young fish or even for fish laying eggs.

There are all kinds of options just google recycling Christmas Trees for your area. I just looked it up for us and came up with lots of interesting options, including the one we did! 

Give your tree a chance to make a difference after the Holidays or even think about a live tree for next year!

Thanks for stopping by!  

Monday, December 14, 2015

A Taste of the Old South- Pickled Jerusalem Artichokes


We have some really awesome friends who are always sharing seeds and ideas with us, and a couple of years ago they gifted us with a few Jerusalem Artichoke tubers. I wrote a bit more about them back in April in the A to Z challenge, you can check that out here. They are also called Sunchokes and are related to Sunflowers, they grow a very tall stem that tops off with a  daisy or sunflower type flower in clusters. They grow mainly on the eastern seaboard and can be invasive so beware when you plant them.

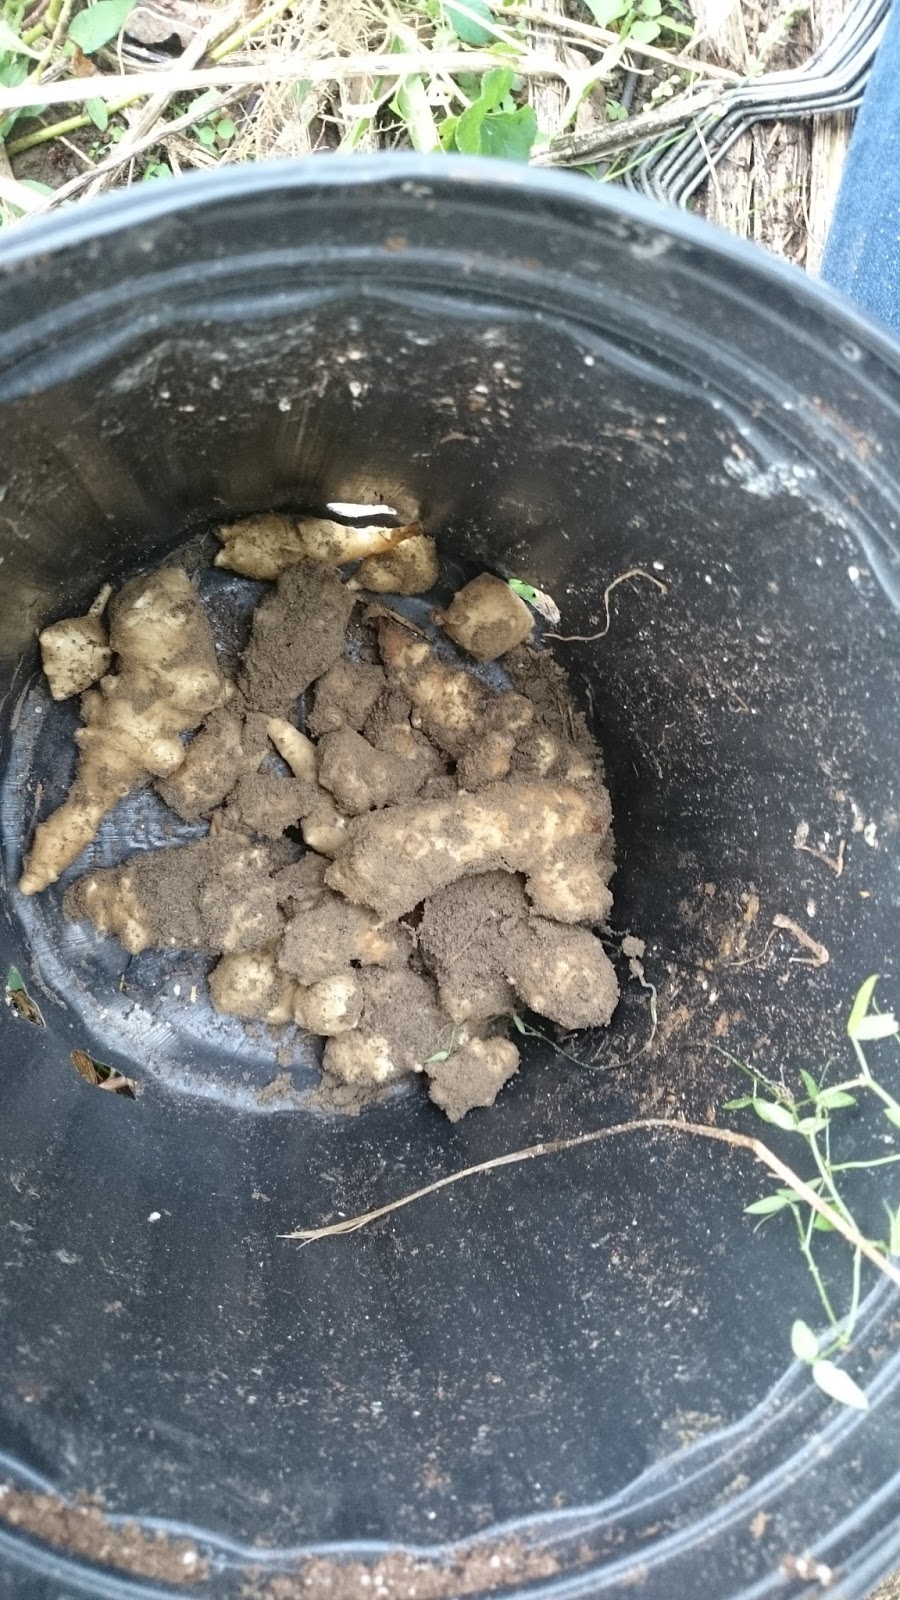
To get the best flavor they say wait to harvest until the first frost. Well we had a bit of a small frost and we were working in the area where we had planted these tubers, so we thought it might be good ideas to dig around and see what we could find..


The first bit of the harvest was a bit less than expected

So we really dug in and the harvest got a bit better

After this I had to help dig so I don't have a picture of the whole harvest but we did end up with more than we expected. We had plenty for mashing and salads and then just enough small for a batch of Pickled. I'm going to walk you through my grandmothers recipe for the pickled version , it takes two days but it is totally worth it. They can also be boiled, roasted or eaten raw.

As you can see from above the hardest part about all of this other than the digging is the cleaning. One wash just isn't going to do it. I swish and washed but those nubbies just hang on to the dirt. 

Some people say that you can just peel them but these are on the small side so I decided to brush them so they could retain their bumpy personality. Of course I didn't have a vegetable brush so I had to make due with an old tooth brush. I knew I keep them on hand for a reason

Much better, don't you think? They're finally ready to go into the brine, which is the easy part.
Never fear, I'll give you the recipe at the end of the post just in case you can get your hands on some,
This is what you end up with early the next morning.

Turmeric is a big part of the recipe and I was glad we decided to plant a bit this year.I'm saving a bit a to plant again this spring. I love have fresh ingredients for our cooking and canning. We'll be adding more herbs to our garden this spring, too. I had posted a picture of the Jerusalem Artichokes to our facebook page asking people to identify it. everyone was convinced that it was ginger, then to really throw them off I posted the Turmeric and no one got that, either. But they loved the finished product.

Here's what we ended up with, we went with some 12 oz that we had laying around and I think it makes a great presentation. I used all of the products shown below for a Relish tray this weekend, Artichokes, Pickled beets, Pickled Brussels Sprouts and Giardiniera, which to me are all rustic country flavors. Most people had never seen any of it before. It was met with a quiet skepticism but soon welcomed by all. I'm glad I can introduce a new generation to old food ideas. 


Finally here's the recipe, 
3 to 4 pounds of Cut Artichokes will make 12 pints

You need to start with the Brine:
1 gallon of water
3 to 4 pounds of cut artichokes (cut them into 1/2 inch bite size pieces)
1 cup of  pickling salt
 Onions (6 to 8 sliced thin) *Optional
1 Tablespoon of turmeric or one small fresh root, sliced

Place Brine in a glass jar and add artichokes,  They should stay in the brine for at least 8 hours,over night if possible.

After the brining time has passed it is time to start the pickling liquid:

3 Tablespoons Mustard seed
2 cups of sugar (or more depending on how sweet you want them)
1 tablespoon whole black peppercorns
2 tablespoons celery seed
2 quarts of White vinegar
1 Tablespoon of turmeric or one small fresh root, sliced

Mix all ingredients in a large stockpot and bring to a boil. While the solution is heating up drain your artichokes and rinse well. 

If you are planning to can these then you will go ahead and sterilize your jars, pack each jar with artichokes and pour hot liquid into jars leaving a 1/2 inch headspace. Hot water bath for 10 minutes. 
Place hot jars in a draft free area, covered until cool. Then place in an out of the way spot for at least a week to allow for the best flavor.

If you are not canning these then remove from the heat and allow the liquid to come down to room temperature. Still Sterilize your jars but pack when cooler. Can be kept in the refrigerator for a couple of weeks, 

Any questions or if I have left out anything please let me know. I appreciate the opportunity to share some of our family recipes that help keep the old flavors from fading away. Now is a great time to find these in your local farmers markets and specialty stores, so grab a couple pounds and enjoy!

Thanks for stopping by!


Thursday, December 10, 2015

Garden Tip Thursday- What Can I Put Into My Compost?

What I should say is "What should I trash and what should I keep for my compost?"

Creating a good compost is easy, think of it as a lasagna and you have to load in layers to get the best result! Turn or stir often to help the process along. By following a few rules of dos and don'ts you'll end up with a great additive for your garden!

Let's start out with the Don'ts since we want to get started on the right path. 

Do not add meat, fat, grease, bones or fish scraps (including scales, tails and heads) these often attract pests such as raccoons and insects. Most composters are not hot enough to kill any bacteria that could be present on these items, especially raw meats, and that's not something you want to come into contact when you are working in the garden..

Any plants from your garden that might have a disease or perennial weeds, the disease can spread to other plants and weed seeds would love nothing better than a new place to dig in.

Human, dog and cat manures are not to be put into a compost that will be used on food crops, due to bacteria that can pass thru the digestive system. I can't imagine using it but I had to put it out there, ya know..

If you are trying to keep your compost as organic or pesticide free as possible, avoid Peach and Banana peels and orange rinds. Unless you are getting an organic version these are the fruit with the most amount of pesticide residue.

Now on to the Do's.  The chemical benefits of compost are generally thought of as Nitrogen and Carbon, the garden and your compost will need a good mix of both.

These Items add Nitrogen to the compost:


Fruit and Veggie Scraps- cooked or raw is fine - Add a bit of dry items, such as a handful
 of leaves or sawdust to keep the moisture levels down.

Grass clippings - like the sawdust add in layers so that it doesn't mat, clumps slow down

 the process. 

Plants- dead or just pulled are fine, but make sure that any weeds have not gone to seed,

 no point in giving them a great place to germinate.

Manure- Chicken and Horse can be used but should be in a newer compost, one that hasn't aged.

 This manure will need to age a bit to be safely used around plants. Alpaca poop can be added anytime.

Coffee grounds and Tea, including the filter and bags, in moderation. Worms love coffee

 grounds so they are good for Vermicomposting too! Regular household amounts are fine, but if 
you are collecting grounds from work or in large quantities you might want to limit the grounds total
 to a quarter of the total pile.

These Items add Carbon to the Compost:


Yard Waste such as Leaves, Branches, Bush Prunings are great to add to your compost as dry items,

 and work best when either shredded or chopped into small pieces. They decompose at slower rate
 but the smaller the pieces the faster the process.

Straw, Pine Needles and Hay, are also good sources of carbon but make sure that you are using a hay

 that doesn't have seeds, you might end up with a crop of grain.

Paper and Cardboard when added to compost should be shredded or at least torn into small pieces.
This will help keep it from clumping up. Avoid using the colored/shiny Ad inserts, they don't break down
as quickly as normal newsprint, so just add them into the normal recycling bin.

Do you have a wood worker in the family, like me? Saw Dust is something that can be added but my

 advise is to add it sparingly or in thin layers so it won't clump. Kinda like cat litter is supposed to do
 when it gets wet.
 I will say we use  sawdust pellets in the chicken coops that soaks up wet droppings and goes from pellet
 to dust. When we turn the piles we always add a few shovelfulls to our compost, it's a good solutions for 
keeping new pellets in the coops and disposing of the old a bit at a time.

To round out this list, I'm adding one of my favorite options, Dryer Lint. Yes you read that right. 

We normal laundry contains mainly natural fibers, and as much of as I do I hate to throw it away.
So go ahead and add it right into the compost!

So we've talked about the science of composting, the equipment needed and what can safely go into
compost,the last installment on composting is what to do when it doesn't seem to working out the
way you had hoped. 

I've been cleaning up and getting the Jerusalem Artichokes pulled and canned, this week. 
Be on the look out for more information and a great recipe for these old fashioned treats!

Thanks for stopping by!


Thursday, November 19, 2015

Garden Tip Thursday- Compost Basics

Hey, I know as gardeners we are always talking about compost and the benefits of it. I know there are lots of people who are interested in composting and have little or no experience with it, other than buying it in a bag at the big box stores. Others think that they don't have the time, area, or expertise to make a great compost. Or you've tried it and it just didn't work out the way you hoped.

I thought it would be a good idea break down the whole idea of composting. From where and how to compost to what can be composted, and them of course how to use it effectively in your garden.

So you want to compost but it seems more complicated than you originally thought. You love the idea that your kitchen waste won't be going to the landfill but it's so much more than that! You don't want to end up with a mess that you can't use or that just seems  to not be breaking down and you're left with a horrible buggy mess. I've seen it at friend's houses, they have great intentions and it's not a difficult process but to get a good result you have to follow a few guidelines.

 There are tons of sites telling you what to do and what not to do but how about kinds of compost to start with. Then you can figure out what actually suits your space and your waste.

Composting at it's main point is about recycling, turning waste into a great soil additive. Nature does it every day.  Organic materials in forest and our yards are processed everyday by the weather, fungus, bacteria and insects, and is turned into a beneficial component of soil.

Aerobic or Anaerobic Composting, which works best? Aerobic composting is done with oxygen, generally above ground or in a holding container that has air circulation. Anaerobic is done by microorganisms that don't need oxygen to survive and is generally considered as pit composting.

Determining which is best for you depends on what you have available and how quickly you want to be able to use your compost.

 Are you working on a new garden space, have plenty of time, or can't leave a pile of what could be smelly scraps next to your neighbors fence? Then a Anaerobic or pit compost would work best for you. And if you have the time to wait it's the easiest option. Dig a pit or trench in the area that can be left alone and dump in your kitchen scraps, leaves or garden wastes and cover back up with a good layer of soil. And that's it.

If you are constantly composting scraps and waste, looking for a quicker turn around or have the area to keep a pile Aerobic is the choice for you. This can be done just as a pile, confined in an area or with a tumbler. The catch is that the organisms that work this way need oxygen, so to keep the process moving at a good rate you will have to put in a bit of work. Turning the pile completely or stirring often is necessary to keep the air flow into the pile. Also to get air to the bottom you can build your pile on a pallet, this will ensure a steady aeration from the bottom. Another benefit of the Aerobic is the heat that it generates, which will often kill weed seeds before they can sprout or transfer to your garden in the soil.

When a compost pile is ready it should look like and have the consistency of dark brown soil.

Neither way is right or wrong, and both are benefits to your garden, your community and the environment. So pick a type and star composting!

In the next few weeks I'll be talking about types of composters available, what should and should not be composted, different composting methods and getting the right mix to get the best out of your compost. I hope you'll stop by and share your composting knowledge and stories with us!

We are still working on our fall garden, creating plenty of compost and thinking ahead to spring seed starting in the green house!


Thursday, August 27, 2015

Garden Tip Thursday- Saving Your Summer Seeds

Saving your own seeds can be easy and well worth the time, but only if your plants were heirloom or traditional varieties. Seeds from Hybrid plants very rarely produce the same result in following years. The seeds have been engineered to produce a certain kind of plant and that doesn't always pass along fully to the seeds.

Not seeing any seeds from some of your produce, not to worry not all plants produce seeds their first year. These are your biennial varieties, like cabbage, beets and other root vegetables. Some climates are friendly enough to plants that they can survive the winter and then produce the greens and seed pods for collection. Most areas this isn't possible, so go ahead and order your carrot seeds for next spring.

When collecting seeds from fleshy vegetables, such as tomatoes and melons, you will want to wait to pick them until the are fully ripe, maybe even a bit over ripe. This will give the seeds time to mature. 
Beans and corn should be left to dry on their own before being picked for seeds. Make sure to be picky about which plants you pick from. These will be your basis for next years garden and you want the ones who are the most robust and healthy, these are also the ones who have shown that they have adapted well to Your Garden's environment.

Fleshy seeds can be scooped out by hand or with a spoon and then spread over a paper plate or paper towel to dry. Remove as much of the moisture and flesh (veggie) as you can, so that you have mainly seeds left.  Make sure that they have a good current of air so they don't mold. We use the paper plate idea because we can write the variety of seed right on the plate. Small seeds all tend to start looking like and I know I have so much going on I can often forgot exactly which plate had my favorite Cherokee Purple Tomatoes on it.

 Corn can be picked when the kernels have "dented" tops, this confirms that they have dried. Beans should be hard and the pods crackly. Keep any eye on them this can happen quickly at the end of summer and you don't want to share all of your hard work with the birds!

Also if you have planted marigolds, keep an eye on them also. They often produce a wispy seed on the flower heads. one flower can produce a lot of seeds and can be blown about your garden. They are great for your garden but you'd might not like to have them every where..

How  you store your seeds is also important. If it's a smaller seed, like tomato or pepper you can keep them in a small coin envelope. We get ours from an office supply store, the size fits well into a trading card holding page that we then put into a binder. For larger seeds, Pumpkin or squash they can be kept in glass jars with a tight fitting lid. But only once they are dried. No matter how you store make sure that you list the variety of seed and when it was harvested. If kept in a cool, dry place seeds can last for many years. This year we planted pumpkin seeds that we harvested 4 years ago and they are growing great. We did have to hide them from E, roasted pumpkin seeds are one of her favorite fall treats! So when you are harvesting your pumpkins make sure to get enough to go around..

As with every thing else that is related to growing your own foods, prices are climbing every year. We get a couple of very nice seed catalogs and I always buy a few exotic seeds as well as seeds for our root veggies but we have come to depend on our saved seeds to save us just a bit more. I hope this information helps you to save seeds and a bit of money at the same time!

Check back next Thursday for another Fall garden idea. Cover Crops!!
I hope you're enjoying your share of dirt this week...


Thursday, May 28, 2015

May Updates

It seems like I just completed the A to Z Challenge in April and here it is already the last week of May. I'd say I've lost a bit of time but all I have to do it step outside and see where it went.

During the A to Z Challenge I did manage to post a theme, (gardening), post everyday and made fairly good use of the letter of the day. The one thing missing was being able to visit every blog at least once during the month. I did hot quite a few  and picked up some new favorites. I'm getting a second chance, with the 2015 Post Challenge road trip. last time I tried to pick blogs that I thought might have a craft or garden theme first then I checked out ones with what I thought was a catchy title. This time I'm working my way down the list from 1 to whatever the last number ends up being.. it's a bit of a work in process right now.

So in that theme I'll go ahead and update you a bit on some of the projects I talked about in April.
Did they work out? Was a it a bust or would I try it again. Check it and out see.

The garden has been planted and it's in full swing. The Umbrella Market stared last week and it was awesome to see our favorite customers again.

I'll start with an update about the Potato Towers.  Despite our later than normal start and the crazy weather we've had the towers are doing great. I even saw a bloom to two the other day!

I think that it's going great so far. It hasn't been much work other than keeping it watered, which I was smarter this year by adding the soaker hoses to the towers. I'll give you a poundage update at harvest time! I'll mark this one as a success and add it to the list for more towers next year. Sweet potato slips are coming on now. I'm wondering if we can do them the same way. There might be a post about that coming soon.

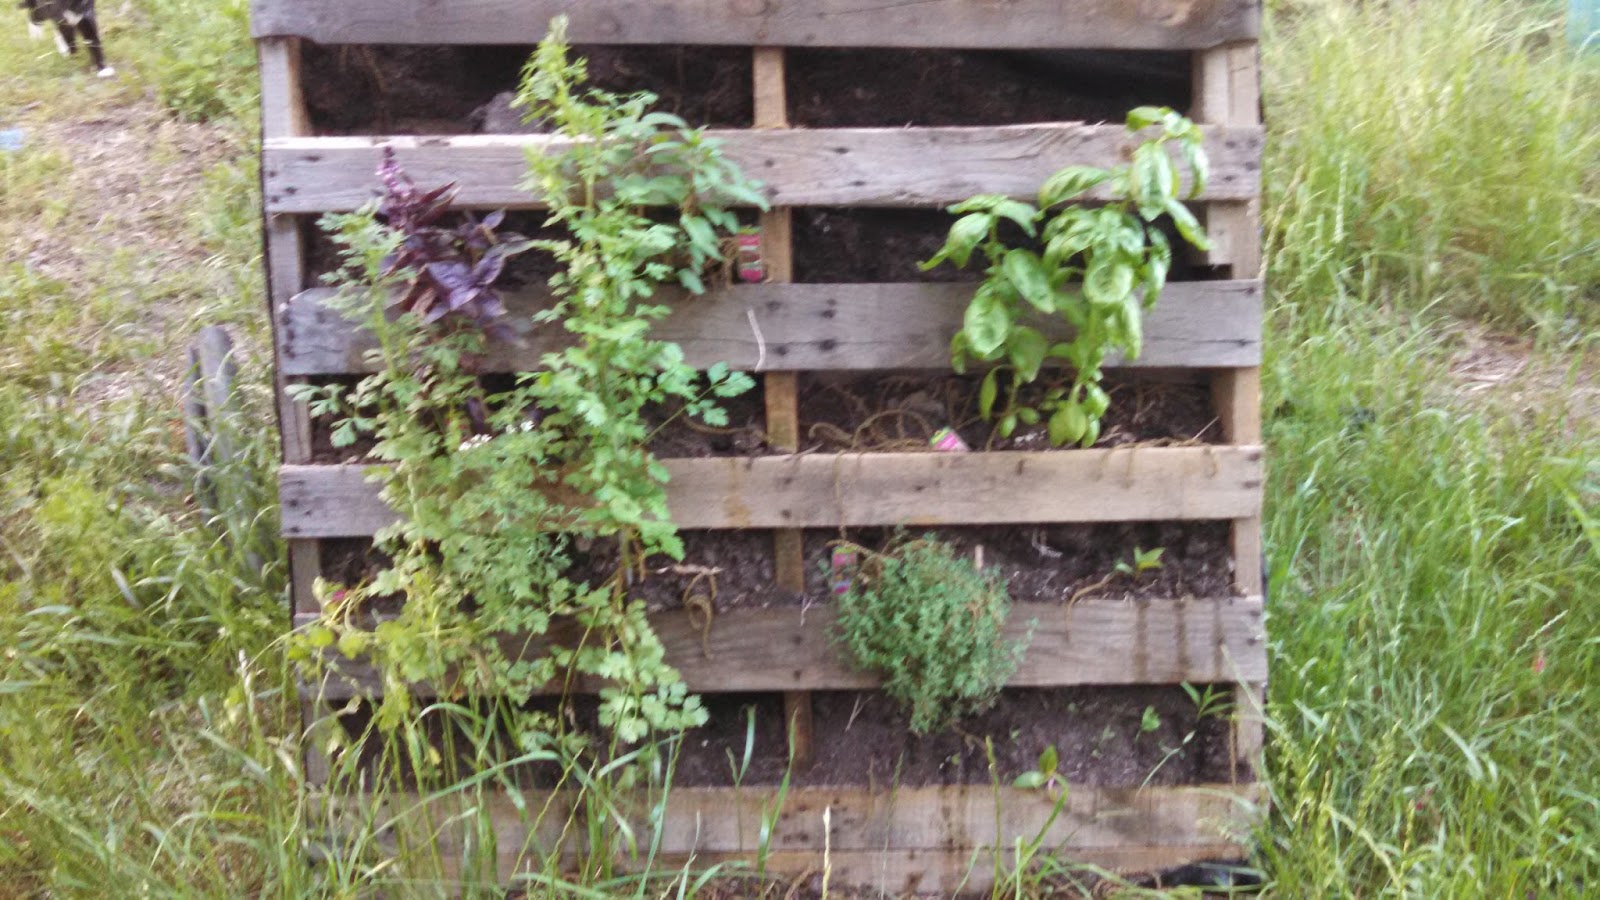
The Pallet herb garden is a so/so project. we got it built but we need to move it to a shady area. Once we get it moved we'll add the rest of the herbs, which are currently residing in pots.


Now that we have worked out the bugs we can write up a tutorial about what not to do..lol. I love the idea and I can't wait to get it moved into the shade and have it full of plants.

I'm always promoting trying something every year in your garden. This year I'm working on Artichokes, real ones not the Jerusalem artichokes that I talked about earlier.  Although those were a "new" product one year too.

These are the  Green Globe variety and we're hoping for a small harvest this year. We are on the edge of the zones for perennial, but we have a plan for over wintering it this fall. Check back for updates!

You can see the kale in the back ground there, I've been busy making Kale Chips with the curly and puppy cookies with the Dino.


 The fuzz butts are about out so I'll be making more soon. I should even share my great recipe for their favorite Carrot, Kale, Cheese Krunchies. I can't tell you how much I love hay for the garden. We are doing the straw bales on the other end of this garden but these are some that were left over from winter crops and we just spread some around the spring plantings. It cuts down on the work and for that I'll take all of the help I can get!

 I'll be working weeding the garden, baking and creating fun jam flavors so to hold you over here's a few more pictures of our fruits that are growing great, so enjoy and check back soon for more ideas, recipes and updates.

Super excited for the plum crop this year. I'm thinking about all of the great flavors of Jam we'll have for the fall!

 And of course my all time favorite is concord grape.


Monday, April 27, 2015

Water Barrels

Following the idea of gardening on a budget and doing for yourself, brings me to the Letter W in the A to Z Blogger Challenge. Today I'm going to show you a great idea for your garden no matter the size you are working with.

Water Barrels or Rain Barrels as they are sometimes called, are a great way to collect free water for your garden or flower bed. We have a few all around our house. Out by the chicken coop and up in the front flower beds too. They are large barrels but they don't stick out like a sore thumb the way you think they would. Once is behind a bush, one is in a constant battle with vines and chickens aren't concerned about something they can hide behind. It's also a great perch for cats. 

Other than being a great sleeping spot for cats they are used for collecting rain water from a down spout or just off of your eaves. Lots of water runs off of your roof every year, why not make some use of it! I'd say that we have collected and used more than a thousand gallons each summer from our barrels. You can buy them from the large box stores, they run close to 100.00 each or you can make your own with just a few supplies and you don't even have to be handy.

We are lucky enough to live near a large pickle company, not too close a couple of counties away but there are always pickle barrels to be found for cheap, so that's what we used. You can use trash cans or any other kind of barrel that will hold water. There are plenty of video's on You Tube showing step by step and here's a great resource with step by step pictures. I'll show you ours and run you through the steps.


  • First You'll pick a container and an area either under a down spout or at an eave that gets a good water runoff. 
  • Then take your lid and drill or cut holes in the top so that can be cover with a screen or mess to keep the leaves and other items out.

This is the top of our pickle barrel we randomly drilled large holes in the top for rain to drain into the barrel. We use a window screen mess to cover the top. It looks like it needs to be replaced!
  • Your next step is to create an over flow near the top. It's not always necessary but we can get a lot of rain quickly and it keeps it from backing up. If you're really smart you can connect two barrels so the second can hold the overflow from the first. That's a project for us this year. We used a piece of PVC threaded so we can cap it off or attach a hose or another system into it. Make sure to not cut the hole too big, we used silicone to keep it in seal it.
  • Then near the bottom you'll want to place a metal spigot into your barrel. That's how you'll use all that great free water. We use this one for the front flower beds by attaching a soaker hose and running it around the bed. We run hoses off of the others for the garden and other uses. We used a larger washer on the inside of the hole to anchor the spigot and then silicone to seal it. 

                                                           
You can see the overflow, we had a gully washer this afternoon. And the spigot on the bottom. We need to add another tank for the rainy spring so we'll have it available when it's hot and dry!

I have to add that while I was looking for a link I ran across a site or two that said that these are illegal in some areas. So  before you begin building check that out. Why collecting rainwater is against the law is beyond me, but some area won't let you dry laundry outside. But that's another soap box, I'll not get on today.

I hope you'll add these to your next weekend project list and come back for more great information on gardening and growing your own food!


Tuesday, April 21, 2015

Straw Bale Gardening

Today's letter in the A to Z Challenge is S and I'm using it for something we are working on here this year. Straw Bale Gardening, Never heard of it? I'm not surprised, while it's a great idea I'm not really sure it's caught on yet. There is a great book,that you can get, and it's been updated just this year.

It's available on Amazon or maybe at your local Library.

The concept is that you plant directly in to a Straw bale that has been conditioned with fertilizer to compost inside by feeding the bacteria that is already present in the bales. So this is a method that is great for those that want to garden but don't have much space or no yard at all. It is also for those who want a garden but just have clay or rocky soil. The straw bales are like a self contained raised bed with out the hassle of tilling and digging, They are also great for those of us with back problems as the bales are up off of the ground and easier to access for planting and harvesting. And the best part, after a season or two you have a great mulch. The reason we did this was due to the state of the soil we had available. It had been part of a tobacco/cotton field and we just didn't want to plant in that with out a bit of conditioning first. 

The conditioning takes any where from 10 days to two weeks. If you're in a cooler climate you can even use them with row covers to create your own mini green houses. If you have plenty of time you can just keep your bales moist and nature will run it's course or you can speed up the process by adding fertilizer every other day to the top of the bale and then watering it in. The second process will still need to be watered every day. Once you are ready to plant top your bale with a couple of inches of compost or garden soil or using a trowel you can spread the hay and plant directly into the bale with a bit of compost. Once the bales are working well you will be able to plant in the sides as well. There are instructions for using organic fertilizers as well as commercial lawn fertilizers. 

Since they are above the ground they will have a tendency in the beginning to dry out quickly. Drip hoses or soaker hoses work great in this situation. Once the bale is decomposing it will hold a good amount of water, and you can water less often. It is important for the whole process that you don't let them dry out. A word of warning, make sure the bales are where you want them, once they get wet they are very heavy and hard to move,
We've started 300 Tomato Plants!

You can see how the decomp is working in the bales.


And of course you always need a helper in the garden. Bales are great because they keep the dogs out of trouble since they can't step in the plants..lol and it's above the chickens so they leave the plants alone too. 

Along with the book there are lots of sites dedicated to talking about how easy and great these gardens are. Wither you want to grow tomatoes, herbs or greens they work wonders for all kinds of plants. Plant early crops and then reuse them for fall crops. Once they have totally given all they have either rake it up and use it in another garden or leave it in place to nourish the soil underneath.

If you are sourcing your bales it is cheaper and easier to buy directly from the grower, Around here bales can go from 1.00 in the field to 4 or 5.00 from a garden supplier. Still it's much cheaper than building a raised bed and in all reality not everyone who wants to garden has that ability.

Check back in a month or so and we'll update the progress. This is our second year and we couldn't be happier. Let me know if you give it a try we'd love ot hear about other success stories!

Thursday's letter is T and I'll be talking about another option for growing "up"! Thanks for stopping in!