Showing posts with label garden ideas. Show all posts

Friday, April 15, 2016

L is for Lemon Grass

Lemongrass is one of those things that the naming is true. It is in the herb family but grows in a large "grassy" clump and the flavor is definitely citrus. Which leads to all kinds of uses in dishes and teas.  It can be grown in the garden or in landscapes in zones 9 and warmer. If you are in cooler climates  you'll want to stick with potted plant that can be brought in over winter or just as an annual.

Interested in growing Lemongrass at home, it can be started from seeds or from shoots. I've found seeds available from Baker Seeds , Johnny's selected seeds and I'm sure there are other companies that carry them. You can also root the plant from stems. If you get a fresh piece go ahead and pull off the outside leaves until you have bare stem. Place it a glass with a couple of inches of water for a couple of days and you should see roots forming in no time. Small leaves will form then you can go ahead and plant in the garden or a pot.
Lemongrass A Garnish Of Tom Yum Goong. (thai Food) Stock Photography - 28801142
image from dreamstock.com
In the garden Lemon grass can grow in a clump from 3 to 5 feet tall. It is a tropical plant and needs full sun, it can be over wintered in warmer climates or kept in a pot and brought in during the cold months. It will need a moist soil, so frequent watering is best.

It's generally used in Asian cuisines but the leaves can also be used to make a tea. It is high in Vitamin C, A, Magnesium and Folic Acid. Lemon Grass tea can be made by seeping one teaspoon of fresh or dried lemongrass leaves in a cup of hot water for 10 minutes. Or you can find it already made into tea bags at specialty stores. The tea has been shown to help arthritis, digestive issues and to lower cholesterol. It has a light lemon taste, unlike many herbal teas have a slightly "weedy" flavor.


Check out these recipes using Lemongrass and then buy a bit extra to add to your garden!


Thanks for stopping by, the crud has caught up to me, I'm blaming it on the weather and this post is a bit late but it's here Today's post is in the works an will be posted today also. So double the reading. Check back for Milkweed for the M post in the A to Z Challenge!

Monday, April 4, 2016

Cabbage Collards is my C

You may or may not know yet that I'm from the Southern United States, we have our own brand of foods in this area and we all have recipes that have been handed down for generations. Some members of my family are often reluctant to move away from the tried and true flavors that they associate with Sunday dinner.
 is for Cabbage Collards

If it was Sunday my Grandmother cooked collards, and it was an experience. First you needed a container of these leafy greens and a "streak of lean", that's fatback for those not raised in the South. Our greens always came from her garden, so no extra strange sprays or chemicals, but those leaves can be crinkly and hold more sand or dirt than you realize. So the multiple washings began. Then there were what felt like hours and hours of boiling and then chopping, to end up with something that was truly awesome but not quite so healthy. Between having the bejesus cooked out of them the fat and the salty meat didn't really lend it's self to beneficial eating.
These are an example of Cabbage Collards that we over wintered in our Garden.

My household is now home to a vegan and we all try to eat a bit healthier, but we really don't want to totally leave our roots behind. We still grow our own Collards, and we use them in a couple of different ways, much healthier ways. The younger leaves make great wraps and are great in salads. But the most asked for recipe is sauteed. Instead of hours over a hot pot stinking your kitchen up, this recipe can be made in less than 15 minutes!

When picking your collards, know that they are generally a cooler weather plant, and it's best to get them locally. Pick up more than you need, these large leaves cook down quite a bit.
  • For three to four servings I use about 2 bunches, generally that translates to two pounds.
  • Wash your greens very well by placing them in your sink or in a basin. swish them around or agitate the water, just spraying won't get the grit off.
  • The stems are a bit tougher than the leaves so go ahead and strip them down. The leaves can be cut up into smaller pieces, or into strips. I prefer the strips, I roll the leaves and then cut thinly crosswise.
  • I normally add garlic, onions sliced thinly, and red pepper flakes but I have also added peppers and pancetta, for those times I've made it for others.
Ingredients:
2 Large bunches of Collard Greens
1/2  Teaspoon of Olive Oil
3 Cloves of Garlic minced
1 Small Onions sliced thin- Optional
1 Green or Red Pepper sliced thin- Optional
Pancetta- Optional
1/4 Teaspoon of Red Pepper Flakes
Salt
 
Directions:
In large saute pan heat 1/2 teaspoon of oil, add in garlic and onions (and pancetta if you are using it). Stir often and cook until everything has browned. Add in greens (and peppers). Continue stirring over medium heat until the greens have wilted. Greens will become bright green and become tender, about 5 minutes. Sprinkle with red pepper flakes and salt. Try for personal preference.

Pretty easy and healthy too. Give it a try and see what you think. Or even plan for a few plants in your garden this fall, nothings easier than picking your dinner right out of your own garden! Do you have a great idea for healthy greens you'd like to share, leave it in the comments below! I'll have to get the recipe together for Collard Kraut, any one interested?

Thanks for stopping by and don't forget to check out all of the other great blogs that are participating in the A to Z Challenge. We're blogging the Alphabet every day in April, with a break on Sundays. I'll be talking about great ideas for your garden, edible foraging, healthy herbs and a few recipes.

I'll see you in the Garden!


Saturday, April 2, 2016

Brussels Sprouts for the B!


Ok So I know that Brussel Sprouts are not everyone's favorite veggie, but what do you know about them? And have you tried them Pickled? Hang around and I'll pass along more some information on those flavorful mini cabbages.


So I've decided that B will be for Brussels Sprouts this year and I other than my kiddo I can hear a collective groan. Would you believe that I think these guys have gotten a bad rap from our mothers who boiled them and plopped them unappetizing on our plates when we were young. Brussels Spouts are in the Cabbage family but the way they grow is interesting, most people have only seen the end result, in a plastic bag, a bit wilted in the produce section. Did you know they actually grow on the stalk of the plant. In fact you they are good space savers for your garden. You can get a large harvest in a small space. The sprouts grow as buds along the stem that can grow from 2 to 4 foot tall. Image result for brussels sprouts
Image from Mother Earth News
Like other brassiciaceae they grow best in the fall or early spring, frost often sweetens the flavor. Plant late summer, or late winter for a harvest in 90 to 180 days depending on the weather. The entire stalk can be harvested or the buds can be harvested from the bottom to the top over a period of time.

While they can be boiled, roasted or grilled, our favorite is pickled! I'll even share our favorite recipe with the more adventurous, and as a plus it's easy. This recipe calls for water bath processing but there are others that can just be refrigerated.

We start with about two pounds of sprouts, rinse, trim and cut them in half. Then soak them in a bowl of salted water for 15 minutes, while you are gathering your other supplies and heating your jars.

  • Two pounds should make you 5 pint jars, so you'll need 5 jars, lids and rings
  • 5 cups of water
  • 5 cups of white vinegar
  • 5 cloves of garlic
  • 11/4 teaspoon of red pepper flakes (to be divided)
  • 7 tablespoons of pickling salt

Drain and Rinse the sprouts well. 
In a large pot bring the water, vinegar and salt to a boil, over medium heat until the salt has dissolved. 
Take heated jars out of the canner and add to each jar 1 clove of garlic and 1/4 teaspoon of pepper flakes, and fill each jar with spouts, pack tightly. 
Pour vinegar mixture over the sprouts up to 1/4 of the top, take a knife and run it along the inside of the jars to make sure all air was been expelled.
Wipe the tops of the jars and put on lids and rings. 
Place jars in a canner with at least one inch of water over the top of the jars bring to a boil and process for 10 mins.

Take the jars out of the water and place jars on a towel and cover with a towel to protect from drafts.
Once the jars have cooled, this could take over night or at least several hours, check the tops to make sure that they have sealed.
It's not quite ready yet, you'll need to wait at least another 3 weeks while they sit in a cool dark place.
Once they are ready don't be concerned about the smell when you open them. It's strong but it's normal. Then enjoy, they are great right out of the jar.


Thanks for stopping by and be sure to check out the A to Z Blogging Challenge for all kinds of blogs. I'll be back on Monday with "C"! Until then you can find me in the Garden!

Friday, April 1, 2016

A is for Amaranth

Let's start off the A to Z Challenge with a plant that does triple duty in the garden!
Amaranth is a beautiful colored plant that adds great drama to your garden, the young leaves are easily harvested for greens and the seeds can be used as grain. We're planting some this year and I hope you'll give it a try too!

Lots of varieties to pick from with lots of brilliant shades of colors, Burgundy, Green and Orange. The seeds are best for a direct sow method just after the last frost of the season. Most varieties grow quickly, can be very tall, some reaching 6 foot and give a good harvest of grains.

There are many types of plants that fall into this category so if you are growing for the grain make sure that you aren't getting an ornamental variety. We chose two kinds Red Calaloo for the greens and Juana's Orange Amaranth for the grain. Check back later in the summer and I'm hoping to have some impressive pictures of my own.

Orange Amaranth from Baker Seed Company
Juana's Orange Amaranth

As I was researching Amaranth, I was surprised to find out this is considered a weed in many parts of the world and it is closely related to what we call "pigweed" here in the southern US, not something you want in your garden. We are trying to learn more about foraging for "good weeds" and other natural products in our area, so while these might not be native we are glad to be able to share some of that information with you.

Harvesting the seeds is said to be easy, once the plant matures, they are cut and hung to dry, which once dry the seeds will fall onto mats or tarps. The seeds can be eaten raw or cooked and have high values of Magnesium and Iron. The leaves are high in Vitamin A and C as well as calcium.

Thanks for stopping by, I'll see you in the garden! Check back tomorrow for something a little more common and I'll have a great recipe for you, Brussel Sprouts.


Thursday, December 17, 2015

Garden Tip Thursday- Help For Compost Problems


So you've started your compost and it's doing great, Awesome! But you have a few issues or it's not going as great as expected. That's okay too. Let's take a minute or two to talk about problems and their fixes so you can get your compost back on track.

The first one on my list of questions we are asked deals with a the pile has a horrible smell. It could be a rotting smell or an ammonia type smell

The rotting smell is the most common, generally what we see is that there has been a large amount of kitchen scraps added to the pile and they are starting to rot, not decompose, there is a difference, the main issue is that the scraps were thrown into pile in a bunch, not chopped or there wasn't a corresponding amount of dry added at the same time. This one is a fairly easy fix. We recommend adding leaves or straw and mix the pile well. This relates to another issue we hear about, flies or other bugs. They are attracted by the smell and should move on to greener pastures as soon as the stirring is complete.

An Ammonia smell relates to too much nitrogen in your pile. This can come from too much fresh manure being added to the pile or too much of green matter such as a large load of grass clippings that are bunched up. Again go ahead and add brown materials to the pile and then stir generously.

If it's not wastes that are creating the stench it could be that there has been just too much water lately. We suggest the same as above, especially the  mixing it could help to allow some of the water to seep through, since it seems to be holded up into the pile. If your region gets high amounts of rain, be sure that any open pile you create is raised up off the ground, such as on pallets or small logs so that the rain can drain easily and not just pool in the bottom of the pile making a soggy mess.

The second contender is related to the problem above, the pile is just too wet and often this results in a slimy mess.  The best way to get back on track is add dry or absorbent materials, such as leaves, turn it more often so that there is air for the microbes to work.

Then there is the opposite problem the pile is just too dry. This is a problem that is easy to combat, just use a nozzle that will give you a rain effect and wet the pile down. It should only be moist and not saturated with water. As we talked about above, too much water causes it's own problems.

The next to last problem is that something is invading your pile. If you turn over the top layer as you start to stir your pile and you see itty bitty bugs that look like armadillos, we call them roly polys down here but they are actually pill or sow bugs. Pill bugs roll up into a ball hence the name and sow bugs don't. They aren't hurting the compost, but they aren't a good additive to your garden, they enjoy new roots and grow a bit too much to be welcome additions. Once you are ready to use your compost and you find you have they guys still you can spread your compost on a tarp in a sunny area and they will move along to cooler climates. No harm no foul. I admit to being a huge fan of "Roly Polys" so I do my best to help them when I can..lol. Hey some kids just love bugs and we never grow out of it..

Another insect could be ants, in this case your compost is too dry, back to the water you go, they will move on once the pile is a bit moist.

Flies, gnats and fruit flies love spoiled foods, if you are having a flying problem make sure that you aren't just dumping food waste into your pile with out a corresponding dry or brown cover. A handful of soil works wonders.

If your invaders are a bit larger, possums, skunks or raccoons, depending on your area perhaps even a bear, you need to know that they aren't after your compost, they are after the treats hidden within. Tasty fruits, fresh veggies or even meat in some climates. If the problem has just started you can try mixing these items with something like ash or dirt, so they aren't as attractive. If it's an on going problem, the best bet is to convert to a closed system with a lid, so the buffet is closed. Unless it's raccoons, I swear we have some that can get the lid off the trash faster than I can.

One last thing you may see in your compost is volunteer plants, this could be good or bad. Tomatoes and squash are famous for this at our house, these we go ahead and transplant if they are in good shape. If it's a weed, we pull it, break it up or chop it and put it back in the pile.

Are these all the problems  or answers you could possibly run into probably not but hopefully it will get your compost moving back in the right direction. Every region is different and the are issues we have run into on our own or at other local composts. Check with your local Master Gardeners or Ag office for more info.

I hope the last few weeks of compost talk has encouraged you to try your hand at composting, big or small it makes a difference in your garden, the local landfill and the environment. It doesn't take a lot of work, can be done cheaply and the results can be very beneficial.

Check back next week for my last compost post, I'll give you one more idea of what to do with your compost....Make TEA!

Thanks for visiting with us!


Thursday, December 3, 2015

Garden Tip Thursday- Types of Composters

Okay so you have decided it is you New Years goal to start composting, I mean really why send all of that good stuff to the dump! It's free and it take a small amount of effort to create something you can really use! Now you need to decide what kind of composter will work best for you. Even if you don't garden, composting a good idea. Anytime something is kept out of the landfill it's a win, and I bet you know someone that would love to have it.

First you need to be realistic about your space availability, plenty of space, great! Only have a balcony or a small patio, that is still workable, no need to give up on your dream of having compost or a garden for that matter. Three 5 gallon buckets or a kitty litter pails will make a great composter for very small spaces. Drill small  holes into one of the buckets and then place it into the other bucket. The bottom bucket will act as collection for your run off and keep your balcony or patio clean. Put both buckets into the third, it's storage right now. After a week or so you can take the empty bottom bucket and dump the top bucket into it, instant aeration and mixing. Clean out your bottom bucket and place it back on the bottom for storage. You'll want to start with a layer of straw or leaves and then you can add your veggies.

If you are okay with worms, then think about a vermicomposting. That can be done small scale right in your kitchen or with a larger composter with layers. It's not as yucky as it sounds and works out great for you and the worms. Back in April I had a post about composting with worms, so you can get the details there. There are DIY options with bins and purchasable units that fit right into your landscape.
This is one we have and it expands, during the warmer months we add more trays when they are very active and take them out when the weather cools a bit.

Have a bit more space then try one of these options. Stationary or Tumbler. Still compact for those who might have a bit more room but don't have a ton of waste. We use these for house waste, well the stuff the chickens can't or shouldn't eat and we have a large free standing bin for yard and garden waste. 

This a a great free standing version, we had this over by the garden and this spring we thought we would move it over by the chicken coops, for convenience.  This one was easy to assemble, was a great price but is hard to stir, easy access to the bottom to take out compost, 


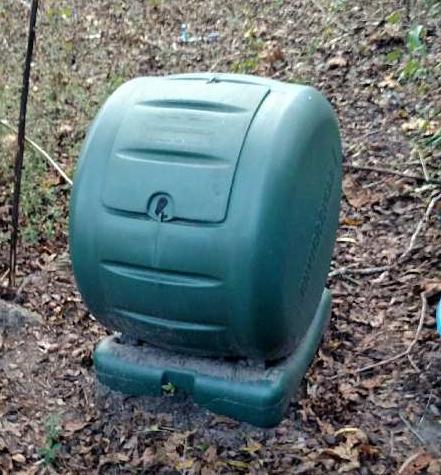
This our tumbling composter. They come in all different styles and sizes, best for homes with small amounts of compostable materials. Easy to use but more difficult to remove the compost once it's ready. You can see the small door on the top, drop in your wastes give it a good push, it rolls around on the base. Easy to hide in your landscaping if you are in an area that frowns upon things in the yard! Here's a great link to show you all of the choices in tumblers.

Of course if you have the area or have lots of waste there are always the large compost bins. Ours is just a three sided box made from old logs, we use it for limbs, garden wastes and grass clippings, with the occasional dump of chicken litter and horse manure. At our house this is a constantly growing pile. We built it up in the back and on the sides with a low front for easy of turning. Types of compost bins vary as widely as the people who make them. My father in law had one he made with chicken wire and tomato stakes. You are only limited by your imagination, just make sure it can breath, doesn't sit in water and can be stirred occasionally. Some are multiple bins so that waste can be turned into the next slot as it ages and new can be started, so you always have a pile in process. Rodale organic has a very easy to follow plan for a three bin here.

No matter what kind of compost you create or how you compost it, you'll still need to know what can and can not be composted. Check back next week and I'll have a great list and some ideas for you.
WE have lots going on this month, we'll be participating in a local Art walk as a Cider Stop as well as selling our Jams, so I've been working on the perfect cider recipe, and we've dug up some of our Jerusalem Artichokes and I've got some great ideas for that gardener on your Christmas list coming up. So check back and see what else is going on around Our Greene Acre! 


Thursday, November 12, 2015

Garden Tip Thursday- Leave the Leaves (for a bit anyway)

Yeah, I said it and I know lots of you are going "What?!" I can't just leave those leaves laying all over the yard! I know that we all want a nice lawn and in some places you don't have much of a choice.
There really is a good reason behind me saying that leaves on your lawn isn't such a bad thing and I'll give you a few reasons as to why that is;

1. Let them stay for a bit, until they are crunchy and mow them into little bits and then leave them. Really it is great mulch for your lawn. It will help keep weed growth down and add natural nutrients back into the soil. It's way better than the expensive bagged stuff.

2. Rake them whole into flower beds and around trees as mulch, as little as two to three inches can do wonders for over wintering bulbs and protecting native plants. The insulation it gives might make a difference for new plants, too. It also gives a home to overwintering insects (I hear ya but some are good bugs too) and small animals. Birds and squirrels often use these areas for foraging too.

3. They are also great to put them into your compost.. Not a composter, many others are, place a listing on craigslist or your community facebook page for free leaves. You'll be surprised how many responses you might get! Don't want strangers coming to your house wandering around , never fear lots of communities will pick up leaves for community projects and composting. Check with your local community garden they often welcome leaves for composting.

4. Do you have an area that you'd like to make into a garden next year or raised beds? Rake those leaves into that area and layer them with paper bags, newspaper and cardboard. Then walk away. Come spring you'll have a nice grass free area to work with, and ready made mulch!

5. And of course if you have a garden make use of the leaves by working them into the soil. Again leave a few inches on top for weed control. Earthworms will quickly move and work the soil for you!

6. Don't forget to pick up a few interesting ones for art projects while your out there too!

7. The  main thing is that they don't end up in plastic in a landfill! If you can't use them please pass the bounty on to someone who can! They aren't doing any good being buried in trash..


We have had the strangest weather this year, not much color in our leaves. Most are still hanging on and I can tell you that I won't be doing anything with them until they are all down..lol.

Have a great Fall and don't be too hard on those leaves!

We've finally gotten some blue skies but not much else in the leave color scheme this year..

Thursday, September 3, 2015

Garden Tip Thursday- Cover Crops

So you've decided that you won't be planting a fall/winter garden or at least a portion of your garden will not be used this fall. Don't just let it sit, plant a cover crop and give back to the soil!

Cover crops, also called "Green Manure" are a great option for your garden during the fall winter months. Of course there is the benefit of nourishing your soil, replacing vital nitrogen and other nutrients back into your soil that all of the plants took out this year, but there are other advantages that a low on labor and resources, too.Cover crops also help protect the soil from erosion, and keep weeds from establishing themselves. Those two things are great by themselves! And if you are like us and have free range poultry there are cover crops that are good for them too!

Here's where the low labor part comes in. Once you have removed all of your summer plants go ahead and rake up the top layer, making sure you have removed any roots that might have been left behind and spread your seeds by hand or with a spreader. Go back over the plot with the rake and cover with an at least two inches of soil, this will help protect your seeds from the migratory birds and other locals looking for a quick meal. Mist a bit with water if it's been dry and that's it. The latest you want to start most seeds would be about a month out from your first frost, this will ensure that the seeds will get a chance to have a good start before the cold weather sets in. Let it grow until late winter or early spring then depending on what you have planted it can either be mowed and then tilled into the soil or just directly tilled in depending on the length of the stalks. Sounds easy right?

So what are your options for cover crops? Here are a few ideas for you. each garden has it's own needs and weather so check these out or contact your local, garden centers, seed catalogues or the ag office in your area.

There are three main types of crops and each one has a different job.

Legumes: This is your pea and clover category. They will reintroduce nitrogen into your soil. Some varieties will bloom in early spring and the blooms are welcomed by bees venturing out early in the season. Look for Crimson or White Clover, Fava Beans (I keep thinking we should get some just so we can insert the line from Hannibal into conversations), Hairy Vetch and Bell Beans.

Grasses: This is your grain Category, They can be most helpful if you have poor hard soils, since their root systems help break up even clay. They are very cold tolerant and stand up well in northern climates as an overwinter crop. The main benefit from them comes from the crop being tilled back into the soil, which composts easily, returning nutrients back into the soil. Rye, Alfalfa, and Oats are all good options for a cover crop.

Brassicas: This is your "other" category, it includes buckwheat, which isn't wheat at all, Phacelia, which is a type of succulent and oilseed radish. These often have large taproots and can help to increase drainage. Buckwheat has a large broadleaf and is good to help choke out other weeds and is used to help put phosphorus back into the soil.

Don't think you have to stick to one kind of cover crops. Lots of places carry nice selections of premixed seeds. We'll be using a mix of Rye, Red Clover  and maybe Alfalfa in our on used sections this year. Not only will we be helping the soil but we'll give the chickens a place to forage, bring in helpful bugs and in the spring we'll have blooms for the bees.

I have included a list of sites where you can buy seeds, if you don't have a good selection or option in your area. I am including companies that we use but only because we have had good luck with their seeds and we believe in what they do. They have no idea that I recommending them, nor do I get anything in return, except for knowing that maybe we helped someones garden out this winter!

High Mowing Seeds  Nice variety and free shipping

Grow Organic Lots of options and they even have options to help you find the right seeds for your area and problems, from attracting the right bugs to size of plants.

Seven Springs Good option if you are working with a large area.

Southern Exposure Seed Exchange  Great Selection of unique options including lots of varieties of Sorghum

It's strange to be thinking about fall and winter crops now, especially today when it's so hot outside but planning ahead is often the best thing you can do for your gardens! So here's hoping you'll have a great weekend for harvesting and digging in the dirt for a bit longer..

Check back in with us for detailed information about compost hows and whys and more information on growing your own great garden!


Thursday, August 27, 2015

Garden Tip Thursday- Saving Your Summer Seeds

Saving your own seeds can be easy and well worth the time, but only if your plants were heirloom or traditional varieties. Seeds from Hybrid plants very rarely produce the same result in following years. The seeds have been engineered to produce a certain kind of plant and that doesn't always pass along fully to the seeds.

Not seeing any seeds from some of your produce, not to worry not all plants produce seeds their first year. These are your biennial varieties, like cabbage, beets and other root vegetables. Some climates are friendly enough to plants that they can survive the winter and then produce the greens and seed pods for collection. Most areas this isn't possible, so go ahead and order your carrot seeds for next spring.

When collecting seeds from fleshy vegetables, such as tomatoes and melons, you will want to wait to pick them until the are fully ripe, maybe even a bit over ripe. This will give the seeds time to mature. 
Beans and corn should be left to dry on their own before being picked for seeds. Make sure to be picky about which plants you pick from. These will be your basis for next years garden and you want the ones who are the most robust and healthy, these are also the ones who have shown that they have adapted well to Your Garden's environment.

Fleshy seeds can be scooped out by hand or with a spoon and then spread over a paper plate or paper towel to dry. Remove as much of the moisture and flesh (veggie) as you can, so that you have mainly seeds left.  Make sure that they have a good current of air so they don't mold. We use the paper plate idea because we can write the variety of seed right on the plate. Small seeds all tend to start looking like and I know I have so much going on I can often forgot exactly which plate had my favorite Cherokee Purple Tomatoes on it.

 Corn can be picked when the kernels have "dented" tops, this confirms that they have dried. Beans should be hard and the pods crackly. Keep any eye on them this can happen quickly at the end of summer and you don't want to share all of your hard work with the birds!

Also if you have planted marigolds, keep an eye on them also. They often produce a wispy seed on the flower heads. one flower can produce a lot of seeds and can be blown about your garden. They are great for your garden but you'd might not like to have them every where..

How  you store your seeds is also important. If it's a smaller seed, like tomato or pepper you can keep them in a small coin envelope. We get ours from an office supply store, the size fits well into a trading card holding page that we then put into a binder. For larger seeds, Pumpkin or squash they can be kept in glass jars with a tight fitting lid. But only once they are dried. No matter how you store make sure that you list the variety of seed and when it was harvested. If kept in a cool, dry place seeds can last for many years. This year we planted pumpkin seeds that we harvested 4 years ago and they are growing great. We did have to hide them from E, roasted pumpkin seeds are one of her favorite fall treats! So when you are harvesting your pumpkins make sure to get enough to go around..

As with every thing else that is related to growing your own foods, prices are climbing every year. We get a couple of very nice seed catalogs and I always buy a few exotic seeds as well as seeds for our root veggies but we have come to depend on our saved seeds to save us just a bit more. I hope this information helps you to save seeds and a bit of money at the same time!

Check back next Thursday for another Fall garden idea. Cover Crops!!
I hope you're enjoying your share of dirt this week...


Thursday, August 20, 2015

Garden Tip Thursday- Direct Sow for your Fall Garden

Last week we talked about starting seeds but there are also other seeds and bulbs that can be direct sown right into your garden late in the summer.

In northern climates your soil is starting to cool off a bit and it's time to plant your garlic. Hardneck varieties do well with colder winters and the softneck are more adapted to more moderate winters. If your temps are falling a bit it's time to go ahead and get your cloves in a well drained loose soil. If it's warm where you are you still have time to put in your orders for your garlic. Garlic has a long growing season but it's worth the wait. It can often be the last thing you plant in the fall. Hardneck varieties are what we grow even though we have a more moderate winter, because you get the added benefit of scapes. Two products in one! For more on Garlic check out a prior post here.

Beets and other root crops are also a great for a fall garden. The benefit from being directly sown into your garden. Parsnips rutabaga and turnips will give you delicious veggies for those fall stews. Radishes are also good for fall gardens, they have a quick turn around of four weeks, so go ahead and put in a few seeds now and a few seeds later to space out your harvest. Celeriac or Celery root has a longer growing season but can withstand cooler temperature and some light frost,

Beans also have a quick turn around and expect a larger crop than your spring growth due to the reduction in beetles during the fall. Beans are easy to dry for later use. So they make a smart addition to your fall garden as well as to your pantry! Be sure to look for a short season pea, shelling or snap, they freeze well and will definitely be enjoyed when the weather turns cooler.

While you are doing all of this work in the veggie garden make sure that you take a bit of time to plant flower bulbs for the spring, too. Flowers such as crocuses and hyacinths will give bees an early boost as they are coming out of winter.


Each region has a different timing for planting and these are just some suggestions, Check out your local garden centers and see what is available in your area!

Thanks for stopping by next week we'll be talking about saving some seeds from your own garden for use next year. Not only is economical but now you have a seed that has been personalized to your area.

Dig Happy and wear your dirt with pride!

Thursday, August 13, 2015

Garden Tip Thursday- Starting Seeds for Fall Plantings

So you've got your area worked up and have add some nutrients back to the soil. While we are waiting for that to work in, we can go ahead and get some seeds started for that Fall Garden.

It sounds counter to what you would think but your best bet is to start your fall seeds indoors. In most climates it's just been too hot for seeds to germinate properly outdoors. I've fallen into the trap of thinking that the warm weather would act as a green house and get them moving faster but in all actuality it's just too hot for them.

What should you start from seeds?
 Kale, Cabbage, Broccoli, Brussels Sprouts, Collards, Mustard,  Swiss Chard, and  Spinach.
Don't forget to try something new too, like Kohlrabi, Rutabaga and Bok Choi.

Depending on your Zone, You will want to start your seeds about 12 weeks before your first frost. Not that those come with a handy schedule but you can check the Farmer's Almanac for an estimated date. For us here in North Carolina that would be August. Some areas will get a longer season and northern climates you are closing in on times to get your cabbage plants out. Other greens will still fair well if started now in the colder climates. But with the weather we have had this year, we might have a bit longer than we think!

Make sure to use a good starting soil, plenty of water and once the sprouts are up use a good organic liquid fertilizer that has been diluted a bit. If you have a protected patio or porch those are both great places to keep your seedlings until they are ready to go out. A couple of weeks in you should have seedlings with true leaves coming out. Be sure to place them in a protected area where they can get a small amount of breeze to help stiffen up the stalks, if you don't have a place safe from birds, direct sun or in our case Chickens, leave them inside and use an oscillating fan for a bit each day.

About three weeks in the plants should be ready to place out in the garden. Plant in the afternoon or on a cloudy day so the seedlings have a bit of time to adjust.

For your rows, fall planting is a bit different that spring. Since the  soil is already warm you'll want to make your rows a bit taller than normal. While the soil is warm now, we will start seeing shorter days and cooler nights soon. Taller hills have more area to warm during the day and this helps for those cooler nights. Also plant a bit deeper than you normally would, the top layers don't have as much moisture available this time of year. Make sure you water your transplants well, less frequent but deeper watering is better than quick watering every day. Mulch is as important now as it was in spring plantings, it will still help keep the moisture in the soil, weeds down but it will help to also keep the heat in around the roots so they can continue to flourish during those cooler/cold nights.

Enjoy getting your Fall crops started and check back next week we'll be talking about what can be directed sewn into your fall gardens!

Thursday, August 6, 2015

Thursday Garden Tips

It's all ready August and I just can't believe it! Fall will be here before you know it and never fear great gardening opportunities are still available.

This weekend would be a great time to get your tired summer garden ready for a great fall garden!

Your first step would be to take out and vines or plants that have passed their prime, if they are still in a healthy shape with no molds or other issues go ahead and put them in your compost. They'll get a another turn in the garden next spring just in a different form. If the plants seem to be diseased or bug infested go ahead and bag them up for disposal. We don't need that in our fall garden!

Now that you have some open space go ahead and add back to your garden. If your spring and summer were as tough as ours has been your going to want to build the soil back up. Use your own compost or your local garden center often has bags available. One local center near us sells compost made by the city. They have a drop off point for yard waste and they grind it up and let it sit. You don't always know what's in it but is encouraging that they are offering this service! If you don't have a compost that's easily available check out "Black Kow". It's a great manure mixture that has been composted and comes if different size bags so there are options for any size garden or gardener for that fact. If you are wanting an organic option I've seen an organic mushroom compost at Lowes and even at our local Harris Teeter.

I know it seems soon but you are going to want to give it a bit of time to settle in and work it's magic before you start the planting season over again! It needs to be done at least two weeks in advance to get a good start for those fall plants.

Now that you've thought about the soil, we'll be thinking about starting fall seeds next.

Check back Next Thursday for tips on starting fall seeds to get the best germination and results in your garden!

Tuesday, June 9, 2015

Pulling Garlic

The weather has been a bit strange this year and while I didn't think it was time to pull the garlic yet, the garlic has different plans. I'm fairly sure that I just cut the scapes off of most of these, but some of the larger plants are turning already. In years past we have waited until July to pull our garlic.

 These larger plants are being pulled today since the leaves and stem are soft and I'm worried about rot.
These smaller plants will be left for a few more weeks since they are still a bit green and are hopefully still growing. The weather has not been their friend this year.


During the A to Z Challenge in April I had a post G is for Garlic, in which I talked about why garlic is such a great addition to your garden. The most work you will put into garlic is after the growing season. Getting it out of the ground, cleaning it up and making it sure dries and doesn't rot.
Check out that root system they have. They really don't want to come out of the ground. 

Once you have pulled your garlic, if your in the south that normally would be late June to July, northern climates are a bit later due to our growing season differences, it is ready to eat. make sure that you keep some of the larger bulbs out for replanting in the fall too!

 But since you have waited almost nine months for this feast you might want to put a bit side for later also. If that's the case or if you have a large harvest you'll want to cure some those bulbs. Don't wash them, you want them to stay as dry as possible. We give them a day or two and then we clean the dirt off of them when it's dried out a bit, some dirt doesn't hurt and it can stay on. You don't want to rub too hard. You can bring them inside, or braid them and hang them in under a carport. Anywhere that gets a good ventilation and is out of the sun. Sun can damage the bulbs and change the flavor. Keep those leaves on, the garlic is still using them for energy until they are completely dried, which can take as much as two months depending on your humidity and weather. Once the leaves have completely dried and the roots are brittle you can trim them off, leaving a bit of root and 1/2 of top. They can then be stored in mesh bags (we hang on to onion bags and use those), cardboard boxes or even pantyhose if you have any laying around. They just need to be in a breathable container so they stay dry. Stored this way they can be kept for 6 to 9 months depending on the variety. They will be just as great as the day the came out of the ground!

I hope that if you haven't tried garlic, we've encouraged you to give it a try, I promise you won't be sorry!

Wednesday, April 29, 2015

Year Round gardening

Wow the month and the Alphabet is almost over. We are down to Y in the A to Z Challenge for Bloggers.

Today I'm using Y to talk about year around gardening. It might not be possible every where to have a garden all year but there are tricks and tips for lots of areas to extend your season.

Want to get a jump on the season. Start your seeds indoors, before the ground is ready and you'll have a good plant stock to start the season with. We start peppers, notoriously slow growers, in January. We also start them from seeds about now but this gives us a longer season of pepper availability. It doesn't take much . We have a green house but we don't use it for the small stuff, we use the extra bathroom to start with. We bring in shelving and some under-counter lights with daylight or grow bulbs the room is warm but we'll use rope lights under the pots for the first week or so to help warm the soil.


Another way to extend your harvest goes along with this. Plant your seeds in batches days or even a week apart. And as long as the weather is holding out continue to reseed. This helps with the problem of everything coming on at once and you have a glut. This way you'll have lettuce, tomatoes and cucumbers for your salad ripening each week!

Another way to start early or run late is to build a cold frame. These can be very easy or very complex. They can be a permanent fixture or something that gets put up every year. A simple one could be a old shower door that you picked up at a salvage yard, laid over straw bales. 
Image from Mother Earth News
It can be a permanent structure. I would expect these to work best in colder climates.
a completed cold frame
Image from This Old House

Row Covers are another way to go for plants that are winter crops, but that might need a bit more protection if the weather turns icy or very cold. These are nice in the fact that they can be used at night but taken off during the day so that they can get the sun and water that they need. Or if you need a bit more warmth they can be left on to increase the inside temperature by 5 to 8 degrees. Sometimes that's all that's needed to get through a storm.

image credit .veggiegardeningtips.com

Hopefully these ideas will help you get a bit more out of your garden season with out a lot of money being expended. Most of these ideas can be made with things that just might be in your shed or that can be made out of things you can recycle that are laying around.

Thanks for stopping by. Tomorrow is the last day of April and the last day of the A to Z Challenge. 
For Z I'll be writing about one last important part of planning your garden. Zones! What zone are you in? We'll find out on Thursday!


Tuesday, April 28, 2015

X Marks the Garden Spot

The A to Z Blogging Challenge is drawing to a close but we have a few letters left. Today is X and I was thinking that it would be a real stretch to find something to write about.  When I think about X for some reason I think X games and generation X but I'll stretch a bit and use it for X marks the Garden Spot.

I think the reason I thought about that was that we have a local summer festival in the next town over called Garden Spot Festival, not to be confused with the festival a few counties over that is a Spot Festival only those are fish.. Ok enough of that, on to the garden stuff..

Customers tell me all the time that they would love to have a garden but for this reason or another they can't. I say it is possible.

 Do you have bad soil? Check out my post on Strawbale Gardening. You'll only need a bit of space and you can grow all kinds of things.

Not much space but okay soil? Try Growing Up^. There are all kinds of plants that need a small amount of ground to grow in but can be trained to grow up and leave you space for the kids and the dog. Have about 6 square foot. Check out Square Foot Gardening.

Only have a balcony? I still have ideas for you. We have friends that have a local nursery and they have gotten smart about helping the apartment dwellers in the area. They are planting cucumbers and squash in hanging baskets. Then there are those Topsy Turvey tomato planters, I haven't had much luck with them because like any other hanging basket they dry out quickly. You can also do great things with vegetables in pots. My mom plants all of her "winter" crops, like butternut squash and spinach in pots. Let them trail out, just watch your step.  Window sills too make great places for herbs and micro greens!

Clever idea: gutter veggie garden
You can make horizontal gardens with Gutters. Image:Lifehaker.com.au


fresh vegetables bottle garden :: vertical gardening :: FineCraftGuild.com
Make Vertical Gardens inside or out by recycling plastic bottles.

There are tons of ideas out there for growing your own foods but I'll finish with a project that my daughter and I are working on for her. She's vegan and wants to grow her own food but doesn't have a ton of time to take care of a garden. We are making pallet gardens for her deck. They don't require weeding, are easy to water, easy to harvest and you can get a big variety in a small space. Plus she's counting on us to supplement her during the winter with canned and frozen variety..lol
We're working on an A frame type, that will have herbs and vegetables. Ours is in the works
but we are taking pointers  from friends of ours who own a nursery. I've been taking pictures as we go so check back soon to see how ours is working out!

This is Carolina Seasons Garden Center's idea of a Herb Garden


When it comes to gardens, you can say where there is a will there is a way. It doesn't matter what level of green or brown thumb you happen to have, you can have some sort of garden to be proud of. Vegetables always taste better straight from the garden. Thanks for hanging in there with me for this crazy month of blogging from A to Z. I'll be back Tuesday with "Y" and how to have a year-round garden!

Monday, April 27, 2015

Water Barrels

Following the idea of gardening on a budget and doing for yourself, brings me to the Letter W in the A to Z Blogger Challenge. Today I'm going to show you a great idea for your garden no matter the size you are working with.

Water Barrels or Rain Barrels as they are sometimes called, are a great way to collect free water for your garden or flower bed. We have a few all around our house. Out by the chicken coop and up in the front flower beds too. They are large barrels but they don't stick out like a sore thumb the way you think they would. Once is behind a bush, one is in a constant battle with vines and chickens aren't concerned about something they can hide behind. It's also a great perch for cats. 

Other than being a great sleeping spot for cats they are used for collecting rain water from a down spout or just off of your eaves. Lots of water runs off of your roof every year, why not make some use of it! I'd say that we have collected and used more than a thousand gallons each summer from our barrels. You can buy them from the large box stores, they run close to 100.00 each or you can make your own with just a few supplies and you don't even have to be handy.

We are lucky enough to live near a large pickle company, not too close a couple of counties away but there are always pickle barrels to be found for cheap, so that's what we used. You can use trash cans or any other kind of barrel that will hold water. There are plenty of video's on You Tube showing step by step and here's a great resource with step by step pictures. I'll show you ours and run you through the steps.


  • First You'll pick a container and an area either under a down spout or at an eave that gets a good water runoff. 
  • Then take your lid and drill or cut holes in the top so that can be cover with a screen or mess to keep the leaves and other items out.

This is the top of our pickle barrel we randomly drilled large holes in the top for rain to drain into the barrel. We use a window screen mess to cover the top. It looks like it needs to be replaced!
  • Your next step is to create an over flow near the top. It's not always necessary but we can get a lot of rain quickly and it keeps it from backing up. If you're really smart you can connect two barrels so the second can hold the overflow from the first. That's a project for us this year. We used a piece of PVC threaded so we can cap it off or attach a hose or another system into it. Make sure to not cut the hole too big, we used silicone to keep it in seal it.
  • Then near the bottom you'll want to place a metal spigot into your barrel. That's how you'll use all that great free water. We use this one for the front flower beds by attaching a soaker hose and running it around the bed. We run hoses off of the others for the garden and other uses. We used a larger washer on the inside of the hole to anchor the spigot and then silicone to seal it. 

                                                           
You can see the overflow, we had a gully washer this afternoon. And the spigot on the bottom. We need to add another tank for the rainy spring so we'll have it available when it's hot and dry!

I have to add that while I was looking for a link I ran across a site or two that said that these are illegal in some areas. So  before you begin building check that out. Why collecting rainwater is against the law is beyond me, but some area won't let you dry laundry outside. But that's another soap box, I'll not get on today.

I hope you'll add these to your next weekend project list and come back for more great information on gardening and growing your own food!


Saturday, April 25, 2015

Vermicomposting

I can hear it now... What in the world are you talking about... Did you make up that word since you needed something for "V" in the A to Z Blogging Challenge..?!

Vermicomposting-Is the process of using worm, mainly red wigglers, to break down food scraps into compost. 

So why compost with with worms? They are great for small spaces, can be used indoors and have very little to no smell. Red wigglers are used generally because they stay near the top of the soil and can eat at last half of their weight every day. As they churn thru your veggie scraps they are producing castings which is a crumbly, granular organic matter that is full of nutrients. The end result is a mix of castings and decomposed organic matter. This matter is a mix that is easier for plants to use and has a higher ratio of beneficial microbes. This helps the plant fend off disease and bugs.
Interested in trying it yourself? We got lucky and found our first set of worms on freecycle! You just never know what you'll see on there! Even if you have to buy a few worms, chances are that you have everything else you'll need to get started. A simple worm bin can be created with a large plastic tote with a well fitting lid. Or it  you are in an apartment a very small bin can be used, but be sure you have a way to drain the moisture off.


  • Find a spot that will get some sun but won't be too hot. If it is an area protected from the weather that is best. 
  • Take your bin and punch or drill small holes in the bottom about 1/4 in size evenly spaced all along the bottom. Then do the same to the top and a few on the sides for Ventilation. You don't want them to get too hot.
  • Place supports that will keep the bin up off of the ground to allow for drainage and circulation.
  • Place a tray under the bin to collect the compost tea that will drain.
  • For the bedding material, you can tear strips of newspaper and then dip them in water. this mimics their natural bedding of leaves. Fluff the paper and fill the bin about 2/3 the way full. It should be a bit damp to the touch.
  • Take a bit of dried leaves and a cup garden topsoil to the top of the paper to add a bit of grit for the digestion process of the worms.
  • Now you're ready to add worms to the bin. Sprinkle them in and cover. 
  • Bury your vegetable scraps in the paper. Don't put in meat, dairy or cooked items. if you are adding citrus only do so in small quantities because of the acidity of the peels.
There is great information on all kinds of worm composters on workingworm.com

Okay the worms are working away, when do you get compost and how do I get it out with out losing my worms?  It should take the worms about 3 to 4 months to go thru their original supply of paper. You can push the material in the bin to one side and fill the other side with fresh materials. Only place food on the new side. In a week or so all the worms should have moved over to the new side and the old can be taken out to use in house plants, around garden plants and for an extra boost when planting! Be sure to share with your friends so they know how smart and green your being!

Do you seem to ave more veggies scraps than your bin can handle? Start another one or check out the advanced bins available for sale. We started with a normal bin but we have a large amount of garden peels and waste when we are canning. The chickens are very spoiled but they have to share with the worms too. We graduated to a  leveled container like the "Worm Factory". It has removable bins and a section on the bottom that collects the "Tea". To start the food and paper or placed in the lowest bin and as it fills we place the paper and food into the next bin and they will travel up to it. Then it's easier to harvest your compost.

This is one of our Worm Composters, I love the spigot it makes taking the tea out so much easier. It's about to be surrounded by Tiger Lilies. Spring is definitely here.


Either way you have a great process for creating your own compost. I started the A to Z Challenge with Alpaca poop and now I've worked my way around to worm poop. I'm afraid I'm seeing a trend here. Check back next week and I'll have another DIY for the garden!

Thursday, April 23, 2015

Trellis and other ideas to get your garden off of the ground

I'm back with the letter of the day for the A to Z challenge. Today's letter is T. While you may have noticed that we do a bit of farming we have a small amount of available land to actually work, so we have to get creative to make the most of the space we have. That is where today's letter comes in.

I'm going to talk about "growing Up" as in growing upwards by using Trellises. Make the most of your space by using it for more than one thing. Many veggies can be trained to grow up instead of out giving you more plants in the same spaces. Or growing plants together or underneath each other.

Grouping plants together to made the most of your space has been around for a very long time. The Native Americans used the Three Sister ideal for gardening. This involves, Corn, Beans and squash. The corn grows up and the beans use the corn as a trellis, then the ground is available for the squash. The Beans add nitrogen to the soil and help anchor the corn, so it won't blow over so easy. The squash acts as a ground cover and keeps the roots cool, helps prevent evaporation and the leaves are prickly so it would keep predators away from the corn.

Use what you have, it doesn't have to be fancy. Already have a fence, grow beans, peas or cucumbers on it. They are easier to reach and won't rot as easily as if they were on the ground. Tree limbs, especially willow make great trellis designs, since the are easily bent.


Want to lure your kids to the garden, try a bean teepee. Take 6 to 8 lightweight wooden poles and in a circle push the ends into the ground a few inches. Make sure you leave an opening large enough to enter along the perimeter. Tie them at the top to complete your structure. Plant your beans every two inches and train them to run up the poles. In no time you'll have a great mystical hiding place in the garden. I always wanted one of these personally but I was lucky enough to have a very old grape vine to hide in as a child. Just a bit of time can build a love for the garden that will last a life time.

how-to-make-a-bean-teepee
http://www.onehundreddollarsamonth.com/how-to-make-a-bean-teepee

 
You know how fast lettuce wilts in the heat, try growing it with cucumbers. Plant your lettuce in a square patch and on one end plant your cucumbers. Build  a slanted trellis that covers the lettuce area. Once the vines grow up over the trellis you'll have instant shade for your shade loving greens. And you get two crops that work great together in small space. We have tried with cucumbers, and squash, both worked out very well. We plan on having a few in a new garden space that we are using this year. 
Cucumber Trellis
Credit to Gardeners Supply for the picture. It's no longer available but you can see how easy it is to make
It's time to start breaking out the tools and scrounging around in the shed all of those bits and pieces that you have held on to. Now you can some great ideas for trellises in your garden. Make the most of your small spaces and branch out to new ideas! Then come back on Friday and I'll be talking about markets and selling. Thanks for stopping by. Wander around a bit you might just find something you'll love!


Tuesday, April 21, 2015

Straw Bale Gardening

Today's letter in the A to Z Challenge is S and I'm using it for something we are working on here this year. Straw Bale Gardening, Never heard of it? I'm not surprised, while it's a great idea I'm not really sure it's caught on yet. There is a great book,that you can get, and it's been updated just this year.

It's available on Amazon or maybe at your local Library.

The concept is that you plant directly in to a Straw bale that has been conditioned with fertilizer to compost inside by feeding the bacteria that is already present in the bales. So this is a method that is great for those that want to garden but don't have much space or no yard at all. It is also for those who want a garden but just have clay or rocky soil. The straw bales are like a self contained raised bed with out the hassle of tilling and digging, They are also great for those of us with back problems as the bales are up off of the ground and easier to access for planting and harvesting. And the best part, after a season or two you have a great mulch. The reason we did this was due to the state of the soil we had available. It had been part of a tobacco/cotton field and we just didn't want to plant in that with out a bit of conditioning first. 

The conditioning takes any where from 10 days to two weeks. If you're in a cooler climate you can even use them with row covers to create your own mini green houses. If you have plenty of time you can just keep your bales moist and nature will run it's course or you can speed up the process by adding fertilizer every other day to the top of the bale and then watering it in. The second process will still need to be watered every day. Once you are ready to plant top your bale with a couple of inches of compost or garden soil or using a trowel you can spread the hay and plant directly into the bale with a bit of compost. Once the bales are working well you will be able to plant in the sides as well. There are instructions for using organic fertilizers as well as commercial lawn fertilizers. 

Since they are above the ground they will have a tendency in the beginning to dry out quickly. Drip hoses or soaker hoses work great in this situation. Once the bale is decomposing it will hold a good amount of water, and you can water less often. It is important for the whole process that you don't let them dry out. A word of warning, make sure the bales are where you want them, once they get wet they are very heavy and hard to move,
We've started 300 Tomato Plants!

You can see how the decomp is working in the bales.


And of course you always need a helper in the garden. Bales are great because they keep the dogs out of trouble since they can't step in the plants..lol and it's above the chickens so they leave the plants alone too. 

Along with the book there are lots of sites dedicated to talking about how easy and great these gardens are. Wither you want to grow tomatoes, herbs or greens they work wonders for all kinds of plants. Plant early crops and then reuse them for fall crops. Once they have totally given all they have either rake it up and use it in another garden or leave it in place to nourish the soil underneath.

If you are sourcing your bales it is cheaper and easier to buy directly from the grower, Around here bales can go from 1.00 in the field to 4 or 5.00 from a garden supplier. Still it's much cheaper than building a raised bed and in all reality not everyone who wants to garden has that ability.

Check back in a month or so and we'll update the progress. This is our second year and we couldn't be happier. Let me know if you give it a try we'd love ot hear about other success stories!

Thursday's letter is T and I'll be talking about another option for growing "up"! Thanks for stopping in!