Thursday, April 7, 2016

Foraging for Fiddleheads


I'm dragging you back to the woods and river banks for today's post. Today we are talking about FiddleHead Ferns and that's really lucky because they are a spring time gourmet wild Vegetable!
I've been checking around our area and I think I may have just missed them for this year. The weather has been very strange, way too hot for April and tonight it's dropping back down to freezing temps, so I'm still on the hunt.

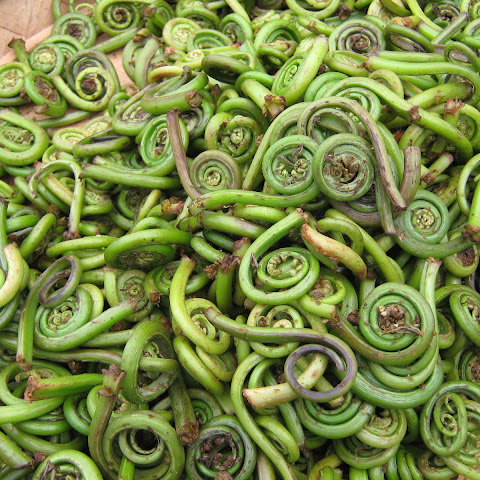
This is what your looking for  :


Fiddleheads, yeah it's a strange name but once you see them you totally get where it's coming from. The tightly coiled shape resemble the scroll of a violin or fiddle if you rather. 

They are the emerging sprouts of wild ferns, most often on the east coast our variety of choice is Ostrich Ferns. They have a taste that could be compared to asparagus. Generally they are seen from April to June, depending on the weather. They can sometimes be found at farmers markets or specialty stores, but for a heavy price. Foraging for your own with friends or family is rewarding as well as much better on the budget. 

Be sure to pick them when they are tightly curled, with brown paper like pieces still attached. Once they have opened the taste is significantly different, be sure to get them early. They are high in fiber like most vegetables, vitamins A and C  and some iron. They should never be eaten raw, and cooking often takes a couple of steps just to make sure that any bacteria has been killed. They will need to be eaten quickly after harvesting, they don't have much of a shelf life but they can be frozen.

So the first step to cooking them is either boil or steam for 10 minutes, then sauteed in olive oil with other greens, they also pair well with eggs.

Species of ferns can be difficult to differentiate between so it's best to have a good field guide to make sure that you are getting the right fern. The Forager's Harvest has a great blog post giving a good description of safe varieties of fiddleheads.

Thanks for stopping by on your A to Z Challenge Trip. Tomorrow I'll be back to a garden variety plant.

See you in the Garden!!


Wednesday, April 6, 2016

Echinacea for the E!


We are back to Herbs today and this is probably one you have heard of. Again I'm going for the double duty plants. This one works as well in your flower bed as well as your garden. Echinacea is even a Biennial which means it regrows for a second year and is a favorite of butterflies, bees, cottage gardeners and medicinal gardeners.

Echinacea or Coneflowers are started from seed and if you are in Northern Climates it's the time to get them started. They can be started in doors or outdoors while it's still cool. They need at least 4 weeks of cool wet weather to help them germinate. Fall planting is best but it they are planted later in the spring, they might not flower the first year.

They do well in full to moderate sun and are often paired with other butterfly attracting plants such as Bee Balms, Phlox and Yarrows. They are drought tolerant,and can be grown in large deep pots, due to their long tap roots. Size and colors vary by variety, they range from purple to yellow and from 1 to 3 feet tall. Their blooms last most of the summer and then in Fall the seed heads add interest to your garden.
Coneflower (Echinacea)
Image from sunset.com
Butterflies and Bees swarm the flowers and birds enjoy the fall seed heads but Echinacea has many uses for people too! Native Americans recognized these plants as a treatment for wounds, but over the years it seemed to fall off the radar for most Americans. But in the 90's it saw a big come back.

Using Cranberry juice for a bladder infection, have a slow healing wound, or hay fever problems, Echinacea is a good alternative for treating these problems. The leaves can be brewed for tea, made into creams or steeped to make tinctures. We as a society are quick to run towards antibiotics for quick relief but every year we hear about the new super bacteria. Maybe we should go back to more natural remedies, being created in a lab to fight one type of bacteria can't compete with something is that is naturally complex.

Interested in making a tincture but the information wasn't passed down from your grandmother and you'd rather have the real thing, rather than buying it from Walmart?
Here's some quick information on making one with Echinacea.

  • You'll need to harvest the flowerheads when they are first starting to flower,
  • Put these fresh clippings in a bowl in the ratio of 1 part plant to 2 parts high proof alcohol.
  • Blend well with a immersion blender
  • Place the mixture a jar or bottle than can be strained easily, in a sunny place for two weeks.
  • After the two weeks strain out the plant material and store the sealed jar or bottle in a cool dark place.
As most herbalists and their sites say be sure of what you are using and make sure to check with a doctor before trying anything new. As with any kind of medical treatment there could be unknown reactions. 

I hope you are enjoying our trek into the world of plants, and I hope you'll stop back by to see what else might be on the list for the A to Z Challenge!

See you in the Garden!!


Tuesday, April 5, 2016

D is for Dead Stinging Nettle

First things first, I'm asking you to take a step out side of the grocery store and check out your yard or your neighbors yard for this early spring green. Yes, it's what we would consider a weed, but it is edible. 

Second, it's name is a bit of a misnomer, it's not a nettle but from the mint family. It's a beautiful green and purple, not dead as the name implies. The dead refers to the fact that it doesn't actually sting. It is often confused with henbit, which is edible too, but the leaves are a bit different. And as the name implies Chickens are big fans of both.

If you are going to be adventurous, it has a very short lifespan, so be on the look out for it in your area in early spring. It grows best when days or warm but nights are still cool. It is one of the earliest blooming plants and even if you don't harvest it for yourself, don't pull it up. The bees and hummingbirds are very happy to visit it.
 It can be a bit invasive but the short lifespan keeps it from being a problem.

If you do decide to try it, think smoothies, it's is full of antioxidants and the flowers are on the sweet side. The leaves have a bit of a texture that can be hard to get over but if blended you'll never know. They can me mixed into salads also but I personally would go the smoothie route or perhaps as a tea.

It originated in Europe but as most weeds are they travel with people and grow in any area that is receptive. Purple Dead nettle means "the devouring purple monster" Did I mention it could be invasive...

It has many multiple medicinal uses as a tinsane, it has been used a diuretic, astringent and purgative. Fresh leaves are helpful for external wounds, too.

So far this month we've talked about greens from the garden and greens from your yard, we'll be exploring other new ideas for your garden and kitchen, so be sure to check back tomorrow for E and to see if I can keep up the next few weeks for the rest of the alphabet!

If you liked the idea of blogging the Alphabet make sure you check out the other blogs on the A to Z Blogging Challenge.
 

Monday, April 4, 2016

Cabbage Collards is my C

You may or may not know yet that I'm from the Southern United States, we have our own brand of foods in this area and we all have recipes that have been handed down for generations. Some members of my family are often reluctant to move away from the tried and true flavors that they associate with Sunday dinner.
 is for Cabbage Collards

If it was Sunday my Grandmother cooked collards, and it was an experience. First you needed a container of these leafy greens and a "streak of lean", that's fatback for those not raised in the South. Our greens always came from her garden, so no extra strange sprays or chemicals, but those leaves can be crinkly and hold more sand or dirt than you realize. So the multiple washings began. Then there were what felt like hours and hours of boiling and then chopping, to end up with something that was truly awesome but not quite so healthy. Between having the bejesus cooked out of them the fat and the salty meat didn't really lend it's self to beneficial eating.
These are an example of Cabbage Collards that we over wintered in our Garden.

My household is now home to a vegan and we all try to eat a bit healthier, but we really don't want to totally leave our roots behind. We still grow our own Collards, and we use them in a couple of different ways, much healthier ways. The younger leaves make great wraps and are great in salads. But the most asked for recipe is sauteed. Instead of hours over a hot pot stinking your kitchen up, this recipe can be made in less than 15 minutes!

When picking your collards, know that they are generally a cooler weather plant, and it's best to get them locally. Pick up more than you need, these large leaves cook down quite a bit.
  • For three to four servings I use about 2 bunches, generally that translates to two pounds.
  • Wash your greens very well by placing them in your sink or in a basin. swish them around or agitate the water, just spraying won't get the grit off.
  • The stems are a bit tougher than the leaves so go ahead and strip them down. The leaves can be cut up into smaller pieces, or into strips. I prefer the strips, I roll the leaves and then cut thinly crosswise.
  • I normally add garlic, onions sliced thinly, and red pepper flakes but I have also added peppers and pancetta, for those times I've made it for others.
Ingredients:
2 Large bunches of Collard Greens
1/2  Teaspoon of Olive Oil
3 Cloves of Garlic minced
1 Small Onions sliced thin- Optional
1 Green or Red Pepper sliced thin- Optional
Pancetta- Optional
1/4 Teaspoon of Red Pepper Flakes
Salt
 
Directions:
In large saute pan heat 1/2 teaspoon of oil, add in garlic and onions (and pancetta if you are using it). Stir often and cook until everything has browned. Add in greens (and peppers). Continue stirring over medium heat until the greens have wilted. Greens will become bright green and become tender, about 5 minutes. Sprinkle with red pepper flakes and salt. Try for personal preference.

Pretty easy and healthy too. Give it a try and see what you think. Or even plan for a few plants in your garden this fall, nothings easier than picking your dinner right out of your own garden! Do you have a great idea for healthy greens you'd like to share, leave it in the comments below! I'll have to get the recipe together for Collard Kraut, any one interested?

Thanks for stopping by and don't forget to check out all of the other great blogs that are participating in the A to Z Challenge. We're blogging the Alphabet every day in April, with a break on Sundays. I'll be talking about great ideas for your garden, edible foraging, healthy herbs and a few recipes.

I'll see you in the Garden!


Saturday, April 2, 2016

Brussels Sprouts for the B!


Ok So I know that Brussel Sprouts are not everyone's favorite veggie, but what do you know about them? And have you tried them Pickled? Hang around and I'll pass along more some information on those flavorful mini cabbages.


So I've decided that B will be for Brussels Sprouts this year and I other than my kiddo I can hear a collective groan. Would you believe that I think these guys have gotten a bad rap from our mothers who boiled them and plopped them unappetizing on our plates when we were young. Brussels Spouts are in the Cabbage family but the way they grow is interesting, most people have only seen the end result, in a plastic bag, a bit wilted in the produce section. Did you know they actually grow on the stalk of the plant. In fact you they are good space savers for your garden. You can get a large harvest in a small space. The sprouts grow as buds along the stem that can grow from 2 to 4 foot tall. Image result for brussels sprouts
Image from Mother Earth News
Like other brassiciaceae they grow best in the fall or early spring, frost often sweetens the flavor. Plant late summer, or late winter for a harvest in 90 to 180 days depending on the weather. The entire stalk can be harvested or the buds can be harvested from the bottom to the top over a period of time.

While they can be boiled, roasted or grilled, our favorite is pickled! I'll even share our favorite recipe with the more adventurous, and as a plus it's easy. This recipe calls for water bath processing but there are others that can just be refrigerated.

We start with about two pounds of sprouts, rinse, trim and cut them in half. Then soak them in a bowl of salted water for 15 minutes, while you are gathering your other supplies and heating your jars.

  • Two pounds should make you 5 pint jars, so you'll need 5 jars, lids and rings
  • 5 cups of water
  • 5 cups of white vinegar
  • 5 cloves of garlic
  • 11/4 teaspoon of red pepper flakes (to be divided)
  • 7 tablespoons of pickling salt

Drain and Rinse the sprouts well. 
In a large pot bring the water, vinegar and salt to a boil, over medium heat until the salt has dissolved. 
Take heated jars out of the canner and add to each jar 1 clove of garlic and 1/4 teaspoon of pepper flakes, and fill each jar with spouts, pack tightly. 
Pour vinegar mixture over the sprouts up to 1/4 of the top, take a knife and run it along the inside of the jars to make sure all air was been expelled.
Wipe the tops of the jars and put on lids and rings. 
Place jars in a canner with at least one inch of water over the top of the jars bring to a boil and process for 10 mins.

Take the jars out of the water and place jars on a towel and cover with a towel to protect from drafts.
Once the jars have cooled, this could take over night or at least several hours, check the tops to make sure that they have sealed.
It's not quite ready yet, you'll need to wait at least another 3 weeks while they sit in a cool dark place.
Once they are ready don't be concerned about the smell when you open them. It's strong but it's normal. Then enjoy, they are great right out of the jar.


Thanks for stopping by and be sure to check out the A to Z Blogging Challenge for all kinds of blogs. I'll be back on Monday with "C"! Until then you can find me in the Garden!

Friday, April 1, 2016

A is for Amaranth

Let's start off the A to Z Challenge with a plant that does triple duty in the garden!
Amaranth is a beautiful colored plant that adds great drama to your garden, the young leaves are easily harvested for greens and the seeds can be used as grain. We're planting some this year and I hope you'll give it a try too!

Lots of varieties to pick from with lots of brilliant shades of colors, Burgundy, Green and Orange. The seeds are best for a direct sow method just after the last frost of the season. Most varieties grow quickly, can be very tall, some reaching 6 foot and give a good harvest of grains.

There are many types of plants that fall into this category so if you are growing for the grain make sure that you aren't getting an ornamental variety. We chose two kinds Red Calaloo for the greens and Juana's Orange Amaranth for the grain. Check back later in the summer and I'm hoping to have some impressive pictures of my own.

Orange Amaranth from Baker Seed Company
Juana's Orange Amaranth

As I was researching Amaranth, I was surprised to find out this is considered a weed in many parts of the world and it is closely related to what we call "pigweed" here in the southern US, not something you want in your garden. We are trying to learn more about foraging for "good weeds" and other natural products in our area, so while these might not be native we are glad to be able to share some of that information with you.

Harvesting the seeds is said to be easy, once the plant matures, they are cut and hung to dry, which once dry the seeds will fall onto mats or tarps. The seeds can be eaten raw or cooked and have high values of Magnesium and Iron. The leaves are high in Vitamin A and C as well as calcium.

Thanks for stopping by, I'll see you in the garden! Check back tomorrow for something a little more common and I'll have a great recipe for you, Brussel Sprouts.


Thursday, March 31, 2016

Growing Sprouts for Chickens

I've kinda dropped out of the blogging world for a bit but I'm heading into April with the best of Intentions. I've decided to do the A to Z blogging Challenge again this year to get myself back into the swing of writing again. I really do enjoy the writing, the challenge as well as meeting new people and find new awesome blogs!

My getting back into it post is one  that has been brewing around for a while. I was supposed to be a February post, back when the chickens didn't have any greens, other than what I was hiding from them in the garden. Sorry girls, it's still off limits but you have other things to keep you busy now.
I was feeling sorry for them since the pickings for fresh greens was a bit slim, oh they were still getting scraps and their favorites but the foraging just wasn't happening. So I decided to create some foraging opportunities for them.

What is a Spout? A sprout is a whole grain or seed that has been grown with just water. Once a seed has been germinated it is considered a sprout until it reaches 4 inches, after that it is considered Fodder, which is a whole nother concept. Obviously they start out the same way but since Fodder grows longer it runs the risk of growing bacteria and therefore it takes a bit more attention and work.

Are there any benefits to sprouting grains over just regular feed?
I think so and some science backs that up. Our Girls are spoiled and can get into trouble during the colder months so a bit of well placed sprouts can entertain them as well as give them something healthy in their diet. It has also been shown that sprouts are easier to digest and that the sprout it's self has beta-carotene as well as more available nutrients  as compared to the unsprouted grain.

What kind of seeds should I use? I've sprouted grains and beans for our consumptions but I wanted to try something that would interest the mini velociraptors we have in the yard. So I did some research and came up with Scratch and Peck Foods . They have a great variety of grains, suitable for sprouting or just scatter feedings. I picked the 3 Grain Scratch. As you can see below it's non-gmo and organic, which are both important to us. This type includes Barley, Wheat and Oats, all great for sprouting. We don't have a local retailer so I ordered mine from Amazon. It's not the only thing out there and you can try a variety of seeds, grains or beans that work great for chickens.


Here's a view of the grains. We'll have enough for sprouting, and treats for a while!

Is it hard or time consuming? Sprouting grains is an easy task, that really only takes minutes a day for great results. So if you've sprouted before or aren't really sure what I'm talking about this will walk you through some of the basic steps to get started growing a great supplement for your poultry

Do I need a bunch of special equipment or a ton of space? Nope, I use a couple of containers I had on hand, but you can use jars, used berry containers or check out some of the serious sprouting options out there. I kept my on my kitchen table, it gets a good amount of sun, but window sills are great places too. The temps should be between 45 and  70 degrees. 

Ready to get started? Good Deal here we go!

1.The first thing is to take your grains/seeds and soak them in clean water for 8 to 24 hours. Make sure the water covers the grain completely. I soak mine overnight. It's the last thing I do and then when I get up they are ready to go.
2. Getting your containers ready, Pick a container with very small holes or poke holes in the container you plan on using. Not too big because you don't want to loose you seeds when you rinse. Any size container will do but I recommend smaller containers just because they are easier to handle, and a small amount of seeds will produce a large amount of sprouts.


3.Drain your grains well and spread them into your container 1/4 to 1/2 inch deep.


4. The sprouts will need to be watered and drained completely twice a day for 5 to 6 days. At which time they will be ready to fed to your poultry! I took my containers and put them in a larger container with water, allowed them to sit for a few minutes and they took them out and left then in the sink to drain.

To give you an idea of what you can look forward to, here is a day by look at my efforts!

Day One

Day Two


Day Three- roots are really growing fast!

Day Four- Sprout Side

Day Six - Let the Feast Begin!

I had a few so I strategically placed them around the yard

And the great part is there is no waste! They eat the entire thing!

I hope this encourages you to grow some sprouts for your Flock, I'll be starting another batch this weekend for our newbies, since they are shut in until they get a bit bigger!
Aww aren't they the cutest?

Thanks for stopping by and remember to check out the A to Z Challenge which starts on the 1st! No Fooling here!. I'm going to be talking about a different kind of Fruit,Veggie or Herb everyday. You might just find something you can't wait to try!