Sunday, January 10, 2016

New Years Resolutions from the Farm

I'm having a really hard time believing that it is already a new year. Last year really flew by, and I know all about that ugly saying that time flies as you age, I'm doing my best to ignore that!

So to help me get on track for a New Year I thought I would share some of the resolutions from the farm. I hear that if you share them, there is a better chance that you will be able to stay on track.

1. I'll start with the Chickens, They decided that there maybe a couple of people out there that don't realize that they are tough totally free range chickens. They don't need a sissy coop, they are only partially domesticated anyway. So if you'd like to visit them they'll be right here in the magnolia tree,


Unless the weather is bad then we'll just migrate to the carport..

2. We've heard that we are called Easter Eggers so we promise to make every morning as fun as Easter with an egg hunt. We'll make sure to move to an new spot once you find the old one..

3.  The Dogs promise to ramp up the household protection by keeping the strange guy in the jeep away from our mailbox, let you know if a strange cat wanders into the yard, or a leaf might be out of place in the yard. Just one of the three amigos, she looks like a great watch dog..right..

Watching the yard is a tough job.


4. The cats promise to help me get keep my heart rate up by leaving half eaten moles directly on the top step, right where I'll put my barefoot in the morning as I go out to feed them and the chickens.. but hey, can you resist that face..


5.The humans are working on all kinds of things like getting more organized, being a bit more proactive and working on growing  a larger selection of unusual vegetables for the market, like Kohlrabi, Radicchio and Goji berries, (we planted those last fall!)  The catalogs have come in and I'm working on my order! I might have to scout out a bit more garden space..

6. I'm also pledging to explore the idea of using beets and carrots in jams to give it natural sweetness and make them a bit healthier. I'm always looking for ideas for new flavors, so pass your new ideas along!

I hope this finds you having a really great start to 2016! We have so much planned and we can't wait to share it with you. Thanks for stopping by!  

Thursday, January 7, 2016

Christmas Trees can keep on giving


We are on the Bah Humbug side of the Holidays and didn't even put up a tree this year. But we had visited our friend Toni at Possumwood Acres, which is a wildlife rehabilitation center that works mainly with birds, squirrels and other small mammals. When we lived closer we were able to volunteer when the rescue was just getting started and now that we have moved away we try to drop in a couple of times a year to help and bring donations. I had visited at Thanksgiving since we were home for the Holiday and one of the requests was for Christmas Trees. They use them in the large Raptor enclosures as well as smaller cages as well as wind breaks for the water foul. 

We sent out a request on facebook closer to Christmas to our friends to let us know when they would be done with their trees, so we could take them back down to Toni. Then about a week before Christmas we were at Tractor Supply and they had a large group of trees on clearance, we asked what happens when the holiday is over. They said they would be disposed of unless we were interested in taking them off of their hands. We left our information and not long after we received a call to come pick up the left over trees. 

 We loaded up the trees, a few very old things from our freezer ( for the buzzards), and two boxes of collards from our garden for the swans and headed over to Hubert. Everyone was very happy to see see us arrive and with a few helping hand we unloaded quickly. 

It was one of the few really cold days we've had lately, so we didn't spend as much time hanging around as we normally would have but I can share a few pictures of the residents with you.
This is just one of the owls that have been brought in injured recently, lots of owls and other large birds come in, are rehabilitated and released back into the wild.

This is a "Tea Cup" Pig that out grew the cuteness and was put out to defend herself. She's happily digging for nuts the squirrel's have hidden in a safe new home.

This is tucker and he's happy to me sharing Thanksgiving and Christmas with us running around instead of on a plate!


If your looking to upcycle your tree too, here's a couple of ideas for you, just in case you don't have a local wildlife rehab center that is in need of trees. 

I'm originally from a coastal county and there was always a call for trees to help shore up the dunes, check with your local park service to see what options are available in your area.

Don't have the ability to haul off your tree, birds would love to enjoy your tree right in your back yard for a bit. Make sure you take off all tinsel and ornaments and set your tree out back. You could even add some bird cakes and other feeders to the tree to bring the local birds to your back yard. Once it dries out it will be easier to break part and dispose of.

Some communities have a recycling program to turn trees into mulch. That's a win win for everyone.

Another option right at home is to turn your tree into a refuge for fish! Do you or a friend have a pond then dump it right into the water. It creates a great place for fish to hide, provides a safe place for young fish or even for fish laying eggs.

There are all kinds of options just google recycling Christmas Trees for your area. I just looked it up for us and came up with lots of interesting options, including the one we did! 

Give your tree a chance to make a difference after the Holidays or even think about a live tree for next year!

Thanks for stopping by!  

Friday, December 25, 2015

Happy Howlidays from our Pack to Yours!!


Wishing you a Very Merry Christmas filled with friends, fun, laughter and great food!

Thursday, December 17, 2015

Garden Tip Thursday- Help For Compost Problems


So you've started your compost and it's doing great, Awesome! But you have a few issues or it's not going as great as expected. That's okay too. Let's take a minute or two to talk about problems and their fixes so you can get your compost back on track.

The first one on my list of questions we are asked deals with a the pile has a horrible smell. It could be a rotting smell or an ammonia type smell

The rotting smell is the most common, generally what we see is that there has been a large amount of kitchen scraps added to the pile and they are starting to rot, not decompose, there is a difference, the main issue is that the scraps were thrown into pile in a bunch, not chopped or there wasn't a corresponding amount of dry added at the same time. This one is a fairly easy fix. We recommend adding leaves or straw and mix the pile well. This relates to another issue we hear about, flies or other bugs. They are attracted by the smell and should move on to greener pastures as soon as the stirring is complete.

An Ammonia smell relates to too much nitrogen in your pile. This can come from too much fresh manure being added to the pile or too much of green matter such as a large load of grass clippings that are bunched up. Again go ahead and add brown materials to the pile and then stir generously.

If it's not wastes that are creating the stench it could be that there has been just too much water lately. We suggest the same as above, especially the  mixing it could help to allow some of the water to seep through, since it seems to be holded up into the pile. If your region gets high amounts of rain, be sure that any open pile you create is raised up off the ground, such as on pallets or small logs so that the rain can drain easily and not just pool in the bottom of the pile making a soggy mess.

The second contender is related to the problem above, the pile is just too wet and often this results in a slimy mess.  The best way to get back on track is add dry or absorbent materials, such as leaves, turn it more often so that there is air for the microbes to work.

Then there is the opposite problem the pile is just too dry. This is a problem that is easy to combat, just use a nozzle that will give you a rain effect and wet the pile down. It should only be moist and not saturated with water. As we talked about above, too much water causes it's own problems.

The next to last problem is that something is invading your pile. If you turn over the top layer as you start to stir your pile and you see itty bitty bugs that look like armadillos, we call them roly polys down here but they are actually pill or sow bugs. Pill bugs roll up into a ball hence the name and sow bugs don't. They aren't hurting the compost, but they aren't a good additive to your garden, they enjoy new roots and grow a bit too much to be welcome additions. Once you are ready to use your compost and you find you have they guys still you can spread your compost on a tarp in a sunny area and they will move along to cooler climates. No harm no foul. I admit to being a huge fan of "Roly Polys" so I do my best to help them when I can..lol. Hey some kids just love bugs and we never grow out of it..

Another insect could be ants, in this case your compost is too dry, back to the water you go, they will move on once the pile is a bit moist.

Flies, gnats and fruit flies love spoiled foods, if you are having a flying problem make sure that you aren't just dumping food waste into your pile with out a corresponding dry or brown cover. A handful of soil works wonders.

If your invaders are a bit larger, possums, skunks or raccoons, depending on your area perhaps even a bear, you need to know that they aren't after your compost, they are after the treats hidden within. Tasty fruits, fresh veggies or even meat in some climates. If the problem has just started you can try mixing these items with something like ash or dirt, so they aren't as attractive. If it's an on going problem, the best bet is to convert to a closed system with a lid, so the buffet is closed. Unless it's raccoons, I swear we have some that can get the lid off the trash faster than I can.

One last thing you may see in your compost is volunteer plants, this could be good or bad. Tomatoes and squash are famous for this at our house, these we go ahead and transplant if they are in good shape. If it's a weed, we pull it, break it up or chop it and put it back in the pile.

Are these all the problems  or answers you could possibly run into probably not but hopefully it will get your compost moving back in the right direction. Every region is different and the are issues we have run into on our own or at other local composts. Check with your local Master Gardeners or Ag office for more info.

I hope the last few weeks of compost talk has encouraged you to try your hand at composting, big or small it makes a difference in your garden, the local landfill and the environment. It doesn't take a lot of work, can be done cheaply and the results can be very beneficial.

Check back next week for my last compost post, I'll give you one more idea of what to do with your compost....Make TEA!

Thanks for visiting with us!


Wednesday, December 16, 2015

Almost Wordless Wednesday

We have been gifted with some unseasonably warm weather this week and I thought I would take a second to share. We took a small break from finishing up holiday orders to take the dogs for a run down by the pond early in the morning. All I can say is "Thanks" to Mother Nature for this awesome Holiday Gift. So far I think that the wooly worm had it right!


That water was cold but it didn't stop her...

A little more cautious but the other one totally steered clear..lol


Here's hoping you get a bit of a break in the weather extreme's no matter where you are!

Monday, December 14, 2015

A Taste of the Old South- Pickled Jerusalem Artichokes


We have some really awesome friends who are always sharing seeds and ideas with us, and a couple of years ago they gifted us with a few Jerusalem Artichoke tubers. I wrote a bit more about them back in April in the A to Z challenge, you can check that out here. They are also called Sunchokes and are related to Sunflowers, they grow a very tall stem that tops off with a  daisy or sunflower type flower in clusters. They grow mainly on the eastern seaboard and can be invasive so beware when you plant them.

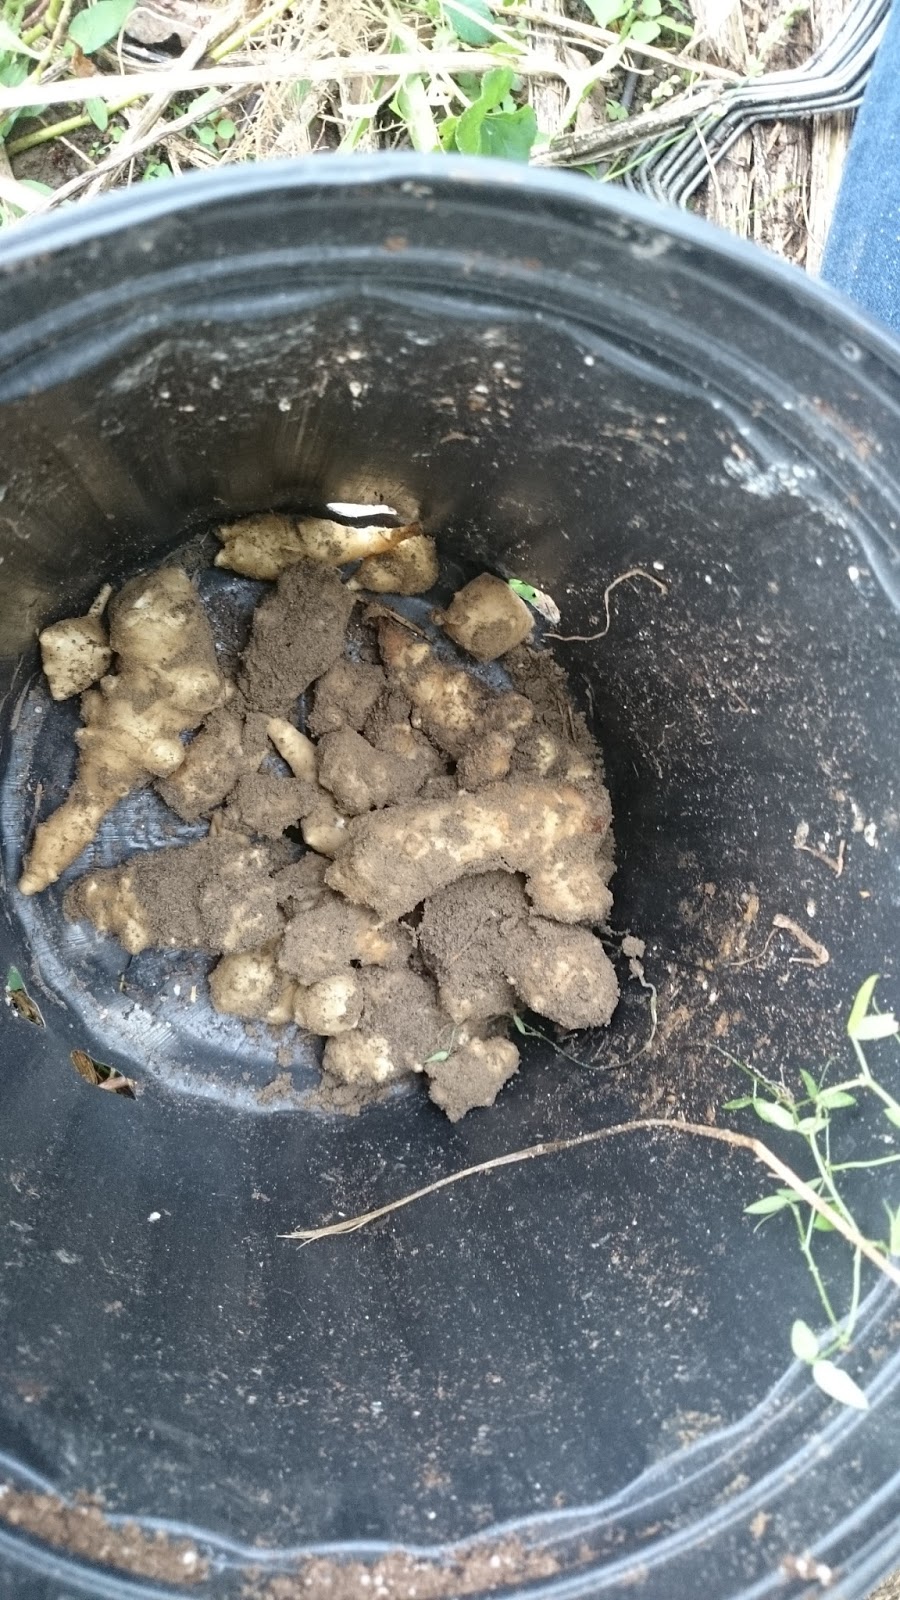
To get the best flavor they say wait to harvest until the first frost. Well we had a bit of a small frost and we were working in the area where we had planted these tubers, so we thought it might be good ideas to dig around and see what we could find..


The first bit of the harvest was a bit less than expected

So we really dug in and the harvest got a bit better

After this I had to help dig so I don't have a picture of the whole harvest but we did end up with more than we expected. We had plenty for mashing and salads and then just enough small for a batch of Pickled. I'm going to walk you through my grandmothers recipe for the pickled version , it takes two days but it is totally worth it. They can also be boiled, roasted or eaten raw.

As you can see from above the hardest part about all of this other than the digging is the cleaning. One wash just isn't going to do it. I swish and washed but those nubbies just hang on to the dirt. 

Some people say that you can just peel them but these are on the small side so I decided to brush them so they could retain their bumpy personality. Of course I didn't have a vegetable brush so I had to make due with an old tooth brush. I knew I keep them on hand for a reason

Much better, don't you think? They're finally ready to go into the brine, which is the easy part.
Never fear, I'll give you the recipe at the end of the post just in case you can get your hands on some,
This is what you end up with early the next morning.

Turmeric is a big part of the recipe and I was glad we decided to plant a bit this year.I'm saving a bit a to plant again this spring. I love have fresh ingredients for our cooking and canning. We'll be adding more herbs to our garden this spring, too. I had posted a picture of the Jerusalem Artichokes to our facebook page asking people to identify it. everyone was convinced that it was ginger, then to really throw them off I posted the Turmeric and no one got that, either. But they loved the finished product.

Here's what we ended up with, we went with some 12 oz that we had laying around and I think it makes a great presentation. I used all of the products shown below for a Relish tray this weekend, Artichokes, Pickled beets, Pickled Brussels Sprouts and Giardiniera, which to me are all rustic country flavors. Most people had never seen any of it before. It was met with a quiet skepticism but soon welcomed by all. I'm glad I can introduce a new generation to old food ideas. 


Finally here's the recipe, 
3 to 4 pounds of Cut Artichokes will make 12 pints

You need to start with the Brine:
1 gallon of water
3 to 4 pounds of cut artichokes (cut them into 1/2 inch bite size pieces)
1 cup of  pickling salt
 Onions (6 to 8 sliced thin) *Optional
1 Tablespoon of turmeric or one small fresh root, sliced

Place Brine in a glass jar and add artichokes,  They should stay in the brine for at least 8 hours,over night if possible.

After the brining time has passed it is time to start the pickling liquid:

3 Tablespoons Mustard seed
2 cups of sugar (or more depending on how sweet you want them)
1 tablespoon whole black peppercorns
2 tablespoons celery seed
2 quarts of White vinegar
1 Tablespoon of turmeric or one small fresh root, sliced

Mix all ingredients in a large stockpot and bring to a boil. While the solution is heating up drain your artichokes and rinse well. 

If you are planning to can these then you will go ahead and sterilize your jars, pack each jar with artichokes and pour hot liquid into jars leaving a 1/2 inch headspace. Hot water bath for 10 minutes. 
Place hot jars in a draft free area, covered until cool. Then place in an out of the way spot for at least a week to allow for the best flavor.

If you are not canning these then remove from the heat and allow the liquid to come down to room temperature. Still Sterilize your jars but pack when cooler. Can be kept in the refrigerator for a couple of weeks, 

Any questions or if I have left out anything please let me know. I appreciate the opportunity to share some of our family recipes that help keep the old flavors from fading away. Now is a great time to find these in your local farmers markets and specialty stores, so grab a couple pounds and enjoy!

Thanks for stopping by!


Thursday, December 10, 2015

Garden Tip Thursday- What Can I Put Into My Compost?

What I should say is "What should I trash and what should I keep for my compost?"

Creating a good compost is easy, think of it as a lasagna and you have to load in layers to get the best result! Turn or stir often to help the process along. By following a few rules of dos and don'ts you'll end up with a great additive for your garden!

Let's start out with the Don'ts since we want to get started on the right path. 

Do not add meat, fat, grease, bones or fish scraps (including scales, tails and heads) these often attract pests such as raccoons and insects. Most composters are not hot enough to kill any bacteria that could be present on these items, especially raw meats, and that's not something you want to come into contact when you are working in the garden..

Any plants from your garden that might have a disease or perennial weeds, the disease can spread to other plants and weed seeds would love nothing better than a new place to dig in.

Human, dog and cat manures are not to be put into a compost that will be used on food crops, due to bacteria that can pass thru the digestive system. I can't imagine using it but I had to put it out there, ya know..

If you are trying to keep your compost as organic or pesticide free as possible, avoid Peach and Banana peels and orange rinds. Unless you are getting an organic version these are the fruit with the most amount of pesticide residue.

Now on to the Do's.  The chemical benefits of compost are generally thought of as Nitrogen and Carbon, the garden and your compost will need a good mix of both.

These Items add Nitrogen to the compost:


Fruit and Veggie Scraps- cooked or raw is fine - Add a bit of dry items, such as a handful
 of leaves or sawdust to keep the moisture levels down.

Grass clippings - like the sawdust add in layers so that it doesn't mat, clumps slow down

 the process. 

Plants- dead or just pulled are fine, but make sure that any weeds have not gone to seed,

 no point in giving them a great place to germinate.

Manure- Chicken and Horse can be used but should be in a newer compost, one that hasn't aged.

 This manure will need to age a bit to be safely used around plants. Alpaca poop can be added anytime.

Coffee grounds and Tea, including the filter and bags, in moderation. Worms love coffee

 grounds so they are good for Vermicomposting too! Regular household amounts are fine, but if 
you are collecting grounds from work or in large quantities you might want to limit the grounds total
 to a quarter of the total pile.

These Items add Carbon to the Compost:


Yard Waste such as Leaves, Branches, Bush Prunings are great to add to your compost as dry items,

 and work best when either shredded or chopped into small pieces. They decompose at slower rate
 but the smaller the pieces the faster the process.

Straw, Pine Needles and Hay, are also good sources of carbon but make sure that you are using a hay

 that doesn't have seeds, you might end up with a crop of grain.

Paper and Cardboard when added to compost should be shredded or at least torn into small pieces.
This will help keep it from clumping up. Avoid using the colored/shiny Ad inserts, they don't break down
as quickly as normal newsprint, so just add them into the normal recycling bin.

Do you have a wood worker in the family, like me? Saw Dust is something that can be added but my

 advise is to add it sparingly or in thin layers so it won't clump. Kinda like cat litter is supposed to do
 when it gets wet.
 I will say we use  sawdust pellets in the chicken coops that soaks up wet droppings and goes from pellet
 to dust. When we turn the piles we always add a few shovelfulls to our compost, it's a good solutions for 
keeping new pellets in the coops and disposing of the old a bit at a time.

To round out this list, I'm adding one of my favorite options, Dryer Lint. Yes you read that right. 

We normal laundry contains mainly natural fibers, and as much of as I do I hate to throw it away.
So go ahead and add it right into the compost!

So we've talked about the science of composting, the equipment needed and what can safely go into
compost,the last installment on composting is what to do when it doesn't seem to working out the
way you had hoped. 

I've been cleaning up and getting the Jerusalem Artichokes pulled and canned, this week. 
Be on the look out for more information and a great recipe for these old fashioned treats!

Thanks for stopping by!